


In 1996, Nokia launched the first mobile phone with internet connectivity: the Nokia 9000 Communicator. Three years later, the first mobile-specific web browser was released, and people had the World Wide Web at their fingertips.
However, the speed of the phone internet was quite slow, and the rendering of the pages was far from satisfactory. Companies started investing time and money to enhance the user experience; technologies like WML, WAP, cHTML, iHTML, M.dot, native apps, responsive design, hybrid apps, and PWA rolled out.
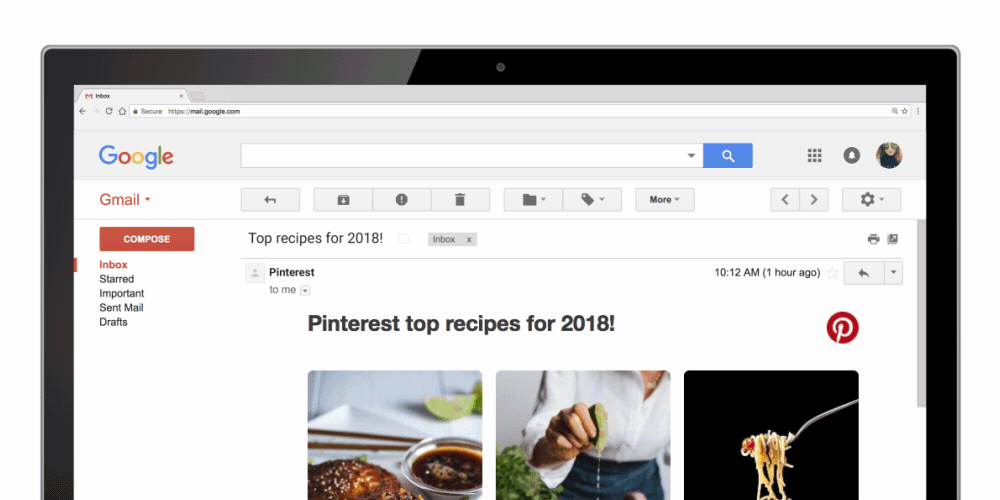
Google came up with ACCELERATED MOBILE PAGES (AMP) in February 2016; it created pages that combined speed and smoother loading. AMP pages loaded quickly without hampering creativity or design and gave people much better page experiences. Just 15 months after the launch of AMP, more than 2 billion AMP pages had found their way onto the web.
In February 2018, Google decided to expand the AMP capabilities to email. Responding to a meeting invite, getting updated flight information, filling out forms/questionnaires, swiping images, searching for products, etc., became possible within an email. There was no need to click out to a third-party website anymore.
Now that you have got a fair idea of AMP, we can move on to explore AMP for email in detail. This definitive guide on AMP for email explains the experiential and technical aspects in simple terms for you.
Whether you are a marketer wanting to use AMP emails or a developer planning to code them, you will find everything you are looking for right here.
Let’s get started!
What is AMP for email?
AMP for email is a powerful tool that can help businesses improve customer engagement by making it easier for customers to interact with emails without having to leave their inbox. You can also add dynamic content elements that automatically update the information whenever the users open the AMP emails.
To make AMP emails display and function as intended, you must ensure certain aspects of technological compatibility. Consider the MAILBOX SERVICE PROVIDERS (MSPs) first: AMP for email is currently supported only by Gmail, Yahoo Mail, Mail.ru, and FairEmail.
MSPs that support AMP for email are few; however, there is a fallback option for others that don’t. You need to add a new MIME part to emails to load like a regular HTML email wherever the MSP or the email client does not support AMP emails.
AMP for email is a technology that lets you include components like carousels, accordions, surveys, forms, games, and more within emails. These transform your email marketing campaigns into compelling customer engagements that increase the ROI.
With various creative AMP components to choose from, every industry can leverage the power of AMP for email. Here are some top-of-the-mind examples:
Ecommerce brands can create a mini-website within emails to include product browsing, comparison of choices, shortlisting, checkout, review and feedback submission, and more.
Banks or financial institutions can add tools like EMI calculators, real-time stock prices, countdown timers, interactive account opening forms, etc., to their emails.
The hospitality industry can display live discounts, offers, upgrades, and their properties’ availability inside emails. It is also possible to include a 360-degree view of rooms with image galleries to build trust with users.
Event management companies can use AMP for email to facilitate quick and easy signup within their emails, show the latest numbers of people registered, display updated information on event sessions, and add a countdown timer to create a sense of urgency.
Travel and tourism players can fit in a lot of information, such as places to see, things to do, where to shop and eat, etc., in limited space using accordions (expandable text). The accordion shows only the titles/subheads and allows users to choose what information they want to see more.
There are scores of AMP components for email; as a stand-alone or in combination with others, each of these AMP components offers countless possibilities for supercharging every email marketing campaign.
In the sections below, we will be examining different AMP components, with visual examples and corresponding technical explanations. You will view real-life applications that inspire you to create successful AMP emails for your campaigns.
*MIME- Multipurpose Internet Mail Extension
What are the things that an AMP email can do but an HTML email can’t?
There is a fundamental difference between AMP emails and HTML emails:
With conventional HTML emails, there is no interactivity other than clicking a link or a button that takes you out of the email and onto an external web page to act.
Most users do not choose to exit the inbox; the drop-off rates can often be relatively high, leaving the desired marketing action incomplete.
With AMP emails, clicking a link or button, leaving the email client, and exiting to a new browser tab to interact further is unnecessary. Everything happens within the email.
HTML emails let you play with the content’s color, font, size, and overall formatting. You can also use customizable email templates. An upgrade over plain text emails, HTML emails are better in driving more traffic and conversions.
AMP emails are several notches higher than HTML emails. An AMP email can include all the UI capabilities of an HTML email while adding a website-like or app-like functionality.
Global studies show that AMP emails can boost your ROI three times more than HTML emails.
The table below highlights the significant similarities and differences between HTML emails and AMP emails.
| ||
| HTML coding | ||
| Embedded text, images, multimedia, URLs, CTA | ||
| Communication emails, transactional emails, marketing emails | ||
| In-email engagement without external page redirection | ||
| Dynamic in nature; update in real-time | ||
| Compulsory domain whitelisting | ||
| Mandatory implementation of SPF and DKIM authentication protocols | ||
| Restriction of ads and third-party data intrusion | ||
| Increased protection against phishing, spoofing, spamming, and fraudulent activities |
AMP Components
AMP is an open-source specification that all email clients can use. The AMP HTML library has a vast collection of components that bring core functionality to your AMP emails. Adding one or more AMP components can incorporate interactive and dynamic features in your emails, thus offering an enriched user experience.
Let’s consider the 16 major AMP components that bring AMP emails alive. In this section, we will deconstruct each of them so that you can learn what they are, how they work, and what they do to make your marketing and transactional emails compelling.
The AMP components are grouped into a few broad categories* such as media, dynamic, layout, and presentation. We will deep dive into these widely used categories that make AMP emails stand out from the rest.
*Note: Google refers to categories as ‘filters.’
1. Media components
Media components are a collection of attributes that let you add elements like images, typically GIFs, to your emails. We will have a quick look at the capabilities of the media AMP components.
(a) amp-anim


Purpose→ amp-anim allows you to add animated images like GIFs and WebP image formats to your emails. The GIFs add an element of movement and liveliness to your emails, making them more attractive to the users.
Example: GIFs are a great way to showcase products. A moving image of a product from all angles gives the users a better look and feel of the product.
Required Scripts→ <script> async custom-element=”amp-anim” src=”https://cdn.ampproject.org/v0/amp-anim-0.1.js”></script>
Description→ The amp-anim component displays a GIF animation with optimized CPU management.
The amp-anim component lets the AMP framework reduce the resources it spends on the animation when it’s off-screen. Otherwise, the behavior of amp-anim is identical to amp-img. You can implement a placeholder element to optimize amp-anim.
You will find detailed information here if you wish to learn more about the media components.
2. Dynamic components
Dynamic components help you integrate highly engaging elements in AMP emails. Using the attributes of dynamic components, you can include email forms, live content updates, games, interactive calendars, etc., in AMP emails. Below are the details of all such AMP components, specifically applicable for emails.
(a) amp-autocomplete
Purpose→ With amp-autocomplete, you can add an autocomplete feature to your text fields. When the users type in a keyword or a few characters, predefined suggestions appear to help users complete their search.
Example: You can simplify the filling out of an event registration form with autocomplete fields for location, pin code, etc.
Required Scripts→ <script async custom-element=”amp-autocomplete” src=”https://cdn.ampproject.org/v0/amp-autocomplete-0.1.js”></script>
Description→ The amp-autocomplete extension suggests complete items based on user input to help users carry out their tasks more quickly. Data gets fetched from a JSON endpoint.
It enhances search experiences where the user may not know the full range of potential inputs. It also helps form inputs where there may be multiple ways to express the same intent (using a state abbreviation instead of its full name, for example) to yield more predictable results.
When using the src attribute with amp-autocomplete, the response from the endpoint contains data to be rendered in the specified template.
You can specify a template in one of two ways:
- A template attribute that references an ID of an existing templating element
- A templating element nested directly inside the amp-autocomplete element
(b) amp-bind
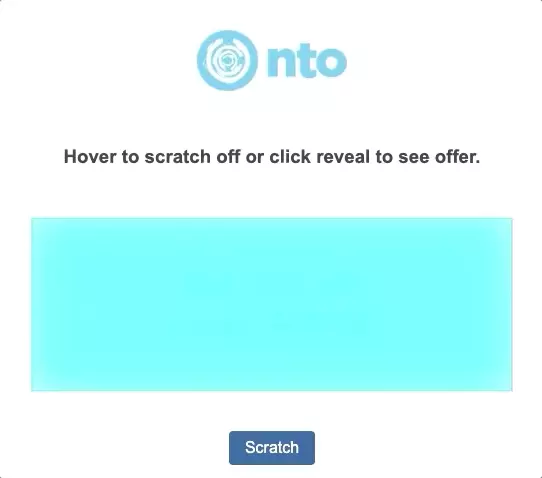
Purpose→ amp-bind allows custom interactivity based on user actions or data changes. This AMP component helps you create a rich user experience by altering elements like text, images, placeholders, etc., whenever a user takes action.
Example: You can create scratch cards, multi-step forms, slideshows, interactive games, and more.
Required Scripts→ <script async custom-element=”amp-bind” src=”https://cdn.ampproject.org/v0/amp-bind-0.1.js”></script”>
Description→ The amp-bind component enables custom stateful interactivity on AMP pages.
For performance and to avoid the risk of unexpected content jumping, amp-bind does not evaluate expressions on page load. It means visual elements should be given a default state and not rely on amp-bind for the initial render.
amp-bind has three main concepts:
- State: A document-scope, mutable JSON state. State variables update in response to user actions. amp-bind does not evaluate expressions on page load. Visual elements should have their default “state” defined and not rely on amp-bind for the initial render.
- Expressions: JavaScript-like expressions that can reference the state.
- Bindings: Special attributes that link an element’s property to a state via an expression. Property is bound by wrapping it inside brackets, in the form of [property].
Each AMP document that uses amp-bind has document-scope mutable JSON data or state. An <amp-state> element’s JSON data has a maximum size of 100KB.
Below outlines the types of errors that may arise when working with amp-bind.
|
|
|
| Invalid binding | Binding to [foo] on <P> is not allowed. | Use only allowlisted bindings. |
| Syntax error | Expression compilation error in… | Verify the expression for typos. |
| Non-allowlisted functions | alert is not a supported function. | Use only allow-listed functions. |
| Sanitized result | “javascript:alert(1)” is not a valid result for [href]. | Avoid banned URL protocols or expressions that would fail the AMP Validator. |
| CSP violation | Refused to create a worker from ‘blob:…’ because it violates the following Content Security Policy directive… | Add default-src blob: to your origin’s Content Security Policy. amp-bind delegates expensive work to a dedicated Web Worker to ensure good performance. |
(c) amp-form

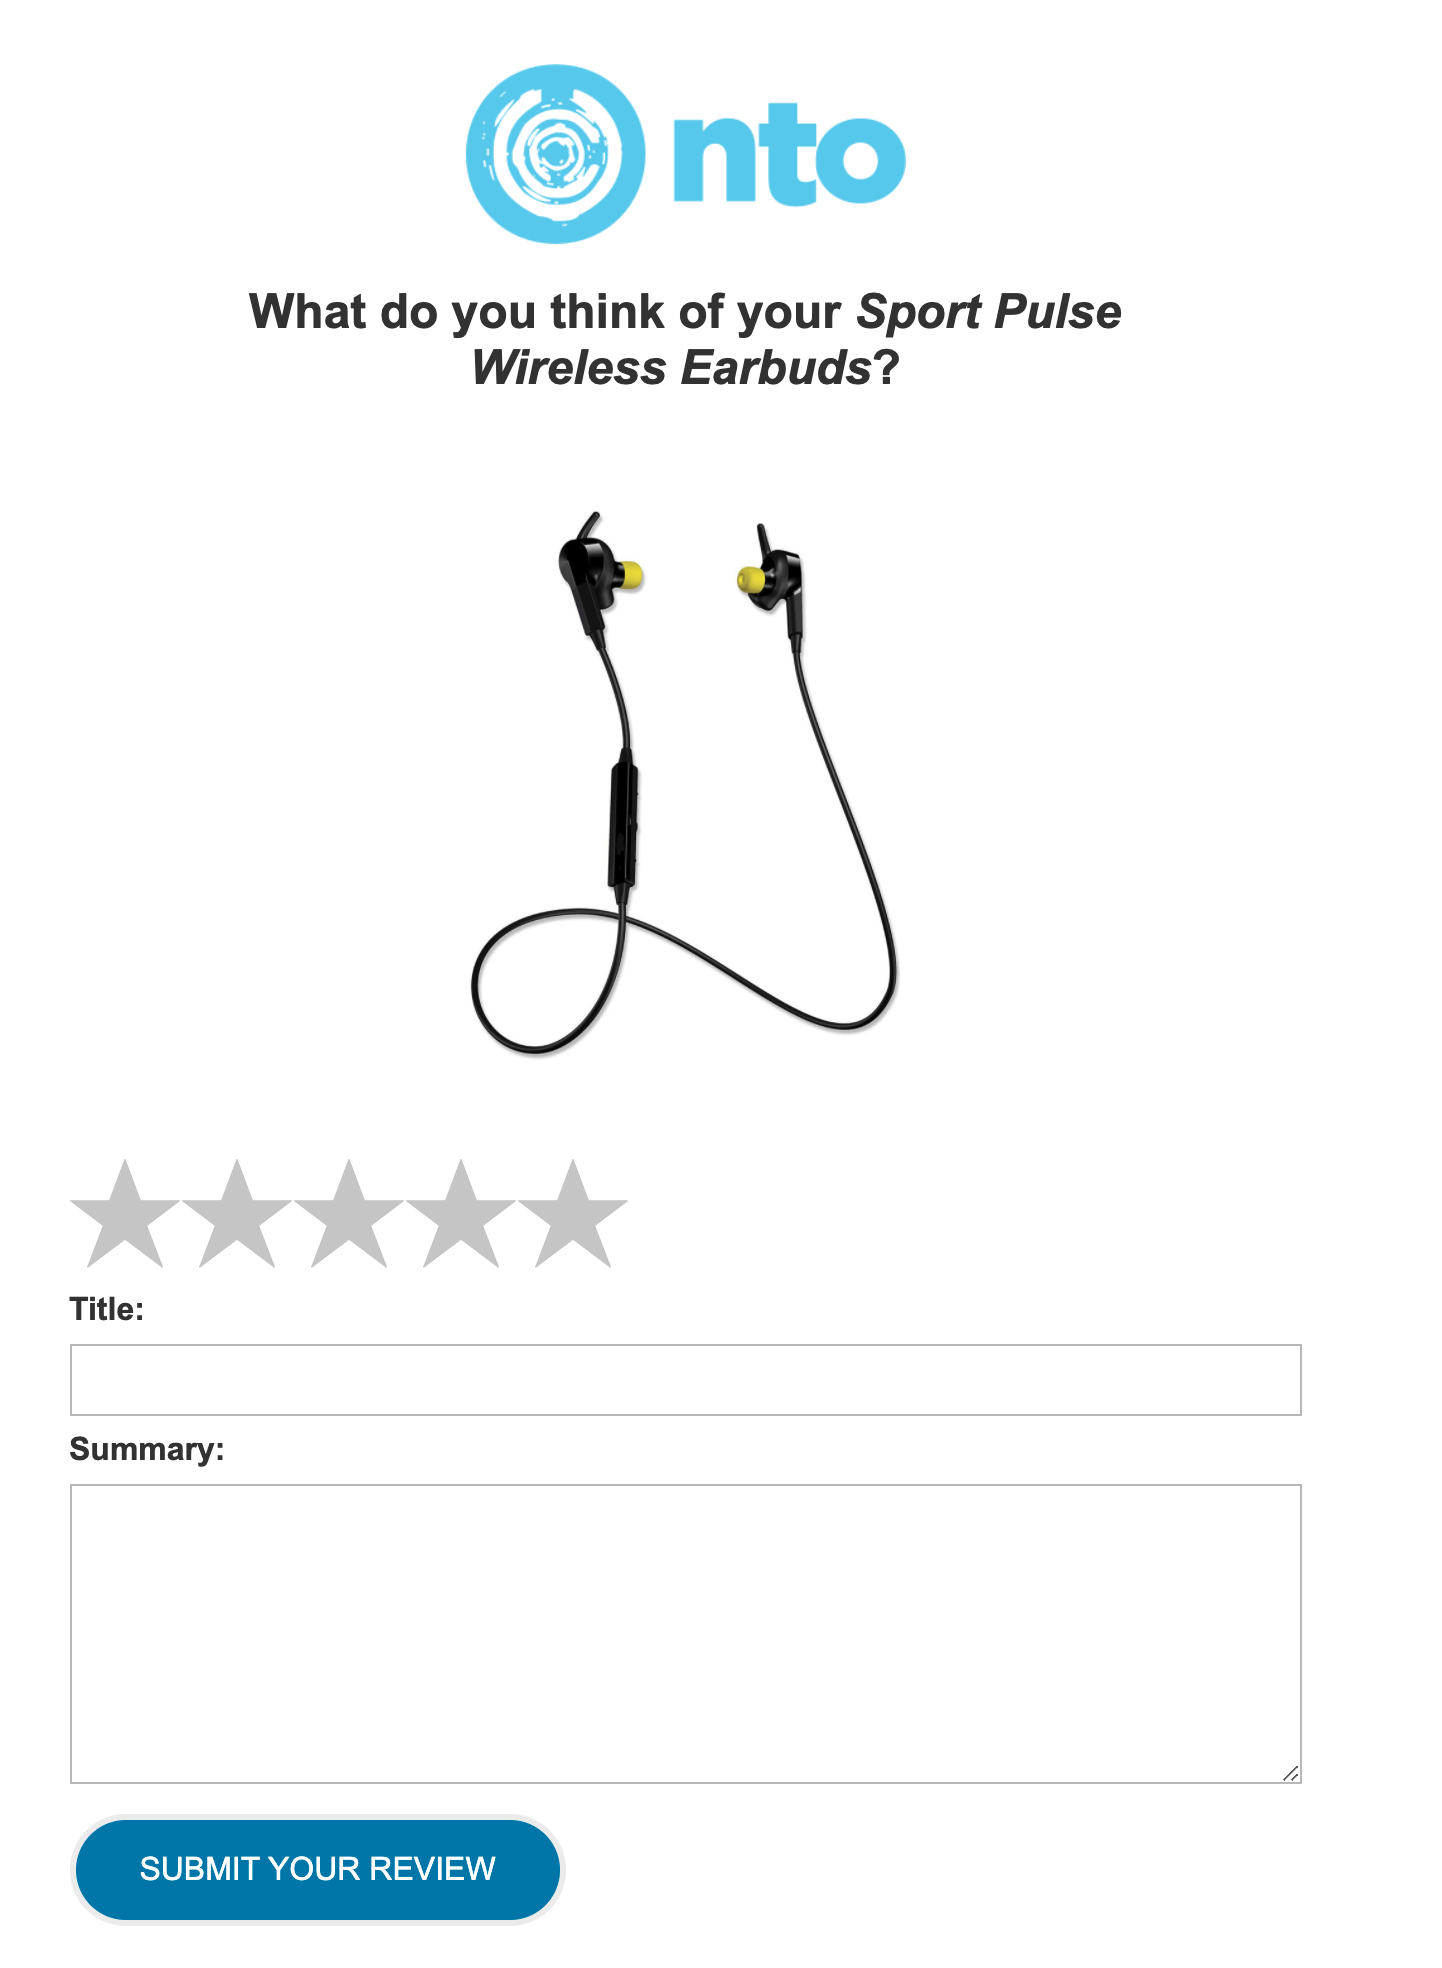
Purpose→ amp-form helps you add interactive forms to your AMP emails. You can significantly reduce the drop-offs due to redirections to external pages for form submissions. This AMP component allows you to get form submissions from users within the email.
Example: Brands can facilitate the users to fill up application forms, feedback forms, signup forms, survey forms, ratings, etc., without being redirected to an external page.
Required Scripts→ <script async custom-element=”amp-bind” src=”https://cdn.ampproject.org/v0/amp-bind-0.1.js”></script”>
Description→ The amp-form extension allows you to create forms (<form>) to submit input fields in an AMP document. The amp-form extension also provides polyfills for some missing behaviors in browsers.
Before creating a <form>, you must include the required script for the <amp-form> extension; otherwise, your document will be invalid. You do not need to load the amp-form extension if you’re using input tags for purposes other than submitting their values (e.g., inputs not inside a <form>).
You can render success or error responses in your form by using amp-mustache or success responses through data binding with amp-bind and the following response attributes:
- submit-success
- submit-error
- submitting
In addition to following the details in the AMP CORS spec, please pay extra attention to the section on “Processing state-changing requests” to protect against XSRF attacks where an attacker can execute unauthorized commands using the current user session without the user’s knowledge.
Keep in mind the following points when accepting input from the user:
- Only use POST for state-changing requests.
- Use non-XHR GET for navigational purposes only (example: search).
- Non-XHR GET requests will not receive accurate origin/headers, and backends won’t be able to protect against XSRF with the above mechanism.
Generally, use XHR/non-XHR GET requests only for navigational or information retrieval.
Non-XHR POST requests are not allowed in AMP documents. It is due to inconsistencies in setting the Origin header on these requests across browsers and the complications supporting it would introduce in protecting against XSRF.
(d) amp-img
Purpose→ amp-img helps add images to AMP emails. This AMP component helps in prioritizing image loadings based on viewport position. You can include product images, product features, picture portfolios, and much more to make emails more compelling.
Example: An image gallery of pictures clicked from a camera, or mobile phone is an acceptable way to reveal the picture quality that users can expect from the product.
Required Scripts→ None specified.
Description→ AMP may choose to delay or prioritize resource loading based on the viewport position, system resources, connection bandwidth, or other factors. The amp-img components allow the runtime to manage image resources effectively.
amp-img components, like all externally fetched AMP resources, must be given an explicit size (as in width/height) in advance so that the aspect ratio can be known without fetching the image. The layout attribute determines the actual layout behavior.
Both the responsive and intrinsic layouts create an image that will scale automatically. The main difference is that the intrinsic layout uses an SVG image as its scaling element. This will make it behave in the same way as a standard HTML image while retaining the benefit of the browser knowing the image size on the initial layout. The intrinsic layout will have an intrinsic size and will inflate a floated div until it reaches either the image size defined by the width and height attributes passed to the amp-img (not by the natural size of the image) or a CSS constraint such as max-width. The responsive layout will render 0x0 in a floated div because it takes its size from the parent, which has no natural size when floated.
(e) amp-layout
Purpose→ amp-layout is a generic, multi-purpose container element that brings AMP’s powerful layouts to any element.
You can use this component to create layouts that adjust as per the user’s device screen size. You can also choose to keep the layout fixed regardless of the screen size.
Example: You can set the layout such that the elements adjust to the aspect ratio when users open an email on their mobile device.
Required Scripts→ None specified.
Description→ The amp-layout component allows you to apply aspect-ratio-based responsive layouts to any element. The amp-layout component works similarly to the layout attribute on existing AMP components but supports any HTML markup as children. Other supported layouts all work with amp-layout (e.g., fixed-height, fixed, etc.).
(f) amp-list


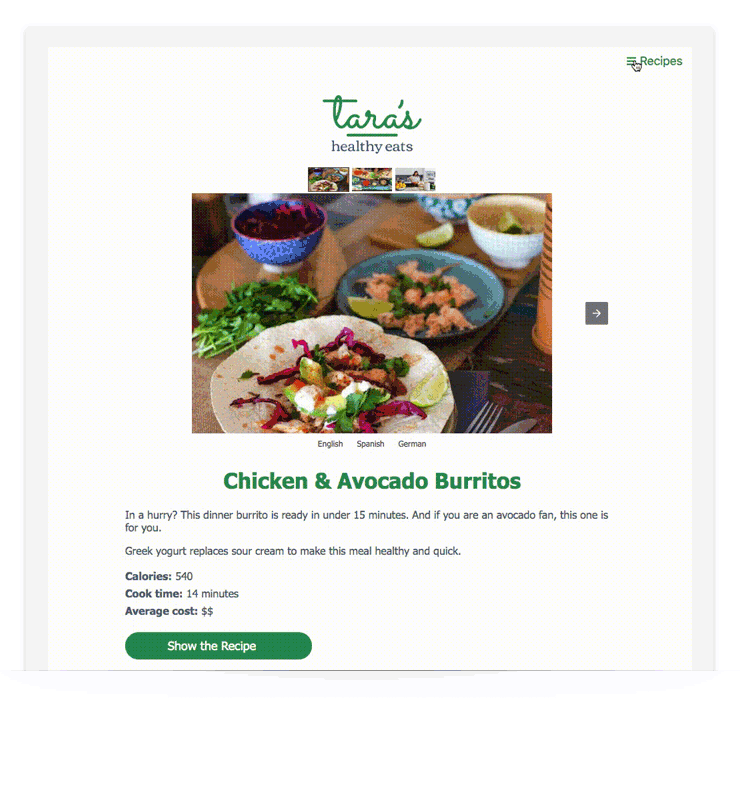
Purpose→ amp-list is responsible for dynamic content that updates with the help of backend data. This AMP component delivers dynamic lists that pull live data into emails, create personalized offers, include content sections, and much more in real time.
Example: You can display updated carts, updated credit balance, additional product images, interactive calendars, etc.
Required Scripts→ <script async custom-element=”amp-list” src=”https://cdn.ampproject.org/v0/amp-list-0.1.js”></script>
Description→ The amp-list component fetches dynamic content from a CORS JSON endpoint. The response from the endpoint contains data, which renders in the specified template.
You can specify a template in one of two ways:
- A template attribute that references an ID of an existing templating element
- A templating element nested directly inside the amp-list element
In several cases, we may need the <amp-list> to resize on user interaction. For example, when the <amp-list> contains an amp-accordion that a user may tap on when the contents of the <amp-list> change size due to bound CSS classes. The changeToLayoutContainer action handles this by changing the amp list to layout= “CONTAINER” when triggering this action.
(g) amp-mustache
Purpose→ amp-mustache is a component that allows the personalization of emails. From adding the first names of the email recipients to offering tailored rewards for each customer, many things are possible with this AMP component.
Example: This component defines a specific customer’s reward under a scratch card. It can be a discount voucher for one customer and a BUY ONE GET ONE (BOGO) offer for another.
Required Scripts→ <script async custom-template=”amp-mustache” src=”https://cdn.ampproject.org/v0/amp-mustache-0.2.js”></script>
Description→ The amp-mustache template must be defined and used according to the AMP Template Spec.
The AMP templating system allows AMP elements to render dynamic content using templates defined within the AMP document. The data for templates comes from a CORS JSON endpoint.
The templates are defined using a templating language exported by an AMP templating extension. For example, “amp-mustache” templates are defined using Mustache.js syntax. However, any templating language has its syntax restricted and verified by the AMP validator to ensure that XSS and other issues cannot be dynamically injected into the AMP document.
Mustache is a logic-less template syntax. See Mustache specification for more details. Some of the core Mustache tags are:
{{variable}}: A variable tag. It outputs the HTML-escaped value of a variable.
{{#section}}
{{/section}}: A section tag. It can test the existence of a variable and iterate over it if it’s an array.
{{^section}} {{/section}}: An inverted tag. It can test the non-existence of a variable.
{{{unescaped}}}: Unescaped HTML. It’s restricted in the markup it may output (see “Restrictions” below).
Mustache gets used for HTML, config files, source code – anything. It works by expanding tags in a template using values provided in a hash or object.
Google calls it “logic-less” because there are no if statements, else clauses, or for loops. Instead, there are only tags. Some tags are replaced with a value, some nothing, and others a series of values.
(h) amp-selector
Purpose→ amp-selector allows you to add a menu of options in the emails. The users can select more than one element from a range of options. Adding product variants or data filters is just one of many practical uses of this AMP component.
Example: Users can select the size and color of the shirt they left in their cart and complete the checkout from their email.
Required Scripts→ <script async custom-element=”amp-selector” src=”https://cdn.ampproject.org/v0/amp-selector-0.1.js”></script>
Description→ AMP selector is a control that presents a list of options and lets the user choose one or many options; the contents of the options can go beyond the text.
- An amp-selector can contain arbitrary HTML elements or AMP components (e.g., amp-carousel, amp-img, etc.).
- An amp-selector cannot contain any nested amp-selector controls.
- Selectable options can be set by adding the option attribute to the element and assigning a value to the attribute (e.g., <li option=’value’></li>).
- Disabled options can be set by adding the disabled attribute to the element (e.g., <li option=’d’ disabled></li>).
- Preselected options can be set by adding the selected attribute to the element (e.g., <li option=’b’ selected></li>).
- To allow for multiple selections, add the multiple attributes to the amp-selector element. By default, the amp-selector allows for one selection at a time.
- To disable the entire amp-selector, add the disabled attribute to the amp-selector element.
- When an amp-selector contains a name attribute, and the amp-selector is inside a form tag, if a submit event occurs on the form, the amp-selector behaves like a radio-button/checkbox group and submits the selected values (the ones assigned to the option) against the name of the amp-selector.
You will find detailed information here if you wish to learn more about the dynamic components.
(3) Layout components
Layout components enhance the structure of your AMP emails. The attributes of layout components let you adjust the content’s orientation, position, appearance, and features. Here is what you can achieve with layout components.
(a) amp-accordion

Purpose→ amp-accordion is a way to include large content in a limited space via a content outline with expandable and collapsible sections. Users can easily interact and quickly jump to the sections they wish to see more.
Example: FAQs are often added as expandable sections to accommodate them on a single page view.
Required Scripts→ <script async custom-element=”amp-accordion” src=”https://cdn.ampproject.org/v0/amp-accordion-0.1.js”></script>
Description→ The amp-accordion component allows you to display collapsible and expandable content sections. This component provides a way for viewers to glance at the content outline and jump to any section. Effective use reduces scrolling needs on mobile devices.
An amp-accordion accepts one or more <section> elements as its direct children.
- Each <section> must contain exactly two direct children.
- The first child in a <section> is the heading for that section of the amp-accordion. It must be a heading element such as <h1>-<h6> or <header>.
- The second child in a <section> is the expandable/collapsible content. It can be any tag allowed in AMP HTML.
- A click or tap on a <section> heading expands or collapses the section.
- An amp-accordion with a defined id preserves each section’s collapsed or expanded state while the user remains on your domain.
Keep the following points in mind when you style an amp-accordion:
- amp-accordion elements are always displayed: block.
- float cannot style a <section>, heading, nor content elements.
- An expanded section applies the expanded attribute to the <section> element.
- The content element is clear-fixed with overflow: hidden and therefore cannot have scrollbars.
- Margins of the <amp-accordion>, <section>, heading, and content elements are set to 0, but can be overridden in custom styles.
- Both the header and content elements are position: relative.
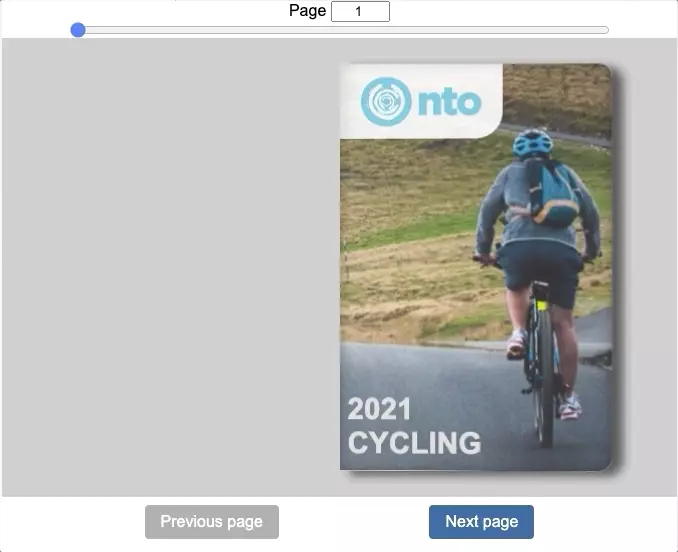
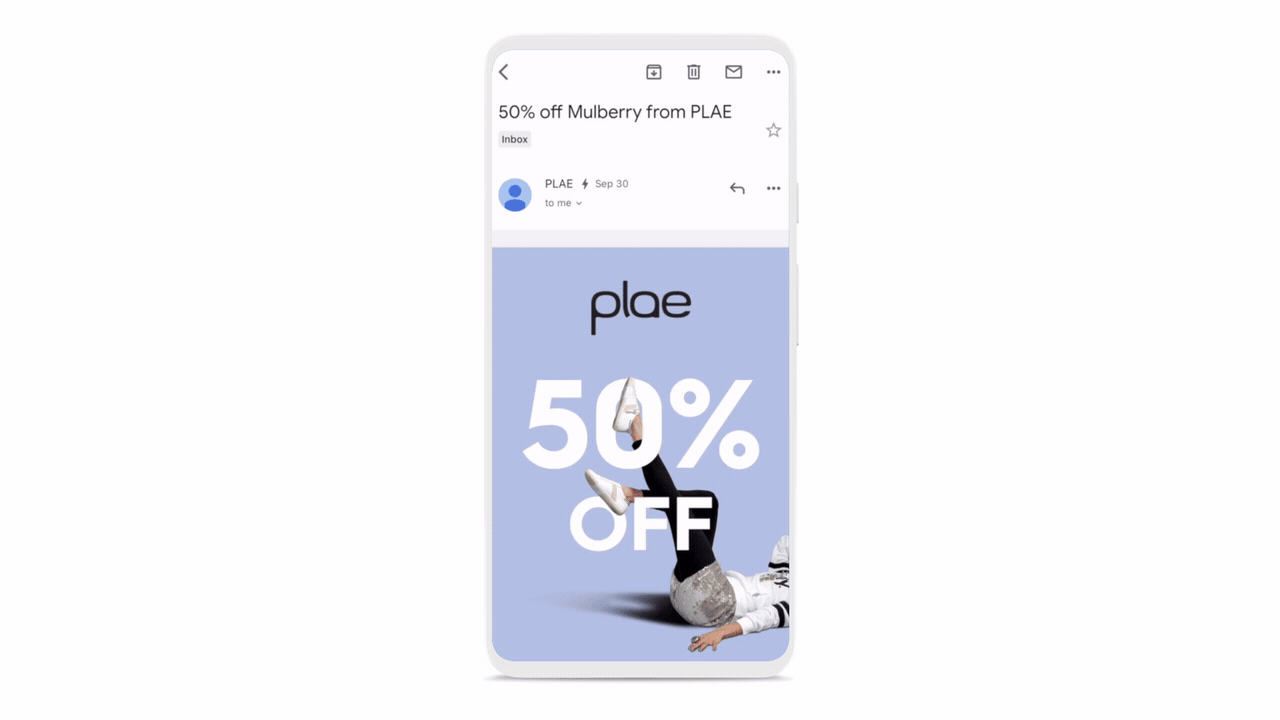
(b) amp-carousel

Purpose→ amp-carousel is an AMP component that allows you to display a carousel of multiple images. You can use it for a slideshow of images that move on the horizontal axis when users swipe or tap on the navigation controls.
Example: E-commerce companies frequently include product image carousels in emails that display multiple product views from different angles.
Required Scripts→ <script async custom-element=”amp-carousel” src=”https://cdn.ampproject.org/v0/amp-carousel-0.1.js”></script>
Description→ Displays multiple similar pieces of content along a horizontal axis. Each of the amp-carousel component’s immediate children is considered an item in the carousel. Each of these nodes may also have arbitrary HTML children.
The carousel consists of an arbitrary number of items and optional navigational arrows to go forward or backward. For type= “slides,” the arrows move one item at a time. For type= “carousel,” the arrows move one carousel’s width forwards or backward at a time.
The carousel advances between items if the user swipes or clicks an optional navigation arrow.
Autoplaying, particularly infinitely looping, carousels can be very distracting and confusing for users – especially those with cognitive impairments. In general, Google recommends avoiding auto-playing carousels. While auto-playing carousels stop once the user has interacted with the carousel, consider adding an explicit “Play/Pause” control.
(c) amp-image-lightbox

Purpose→ amp-image-lightbox is useful to enhance the focus on an image. This AMP component brings the image to the center of the page while making the background elements go under a diffused/darker layer.
Example: Images of rooms on a property can be zoomed in for a clearer view as the users click on them.
Required Scripts→ <script async custom-element=”amp-image-lightbox” src=”https://cdn.ampproject.org/v0/amp-image-lightbox-0.1.js”></script>
Description→ The amp-image-lightbox component provides a lightbox experience for a specified image. The image displays in the center of a full-viewport lightbox when a user clicks the image.
When the user clicks the image, the <amp-img> activates the <amp-image-lightbox> via the on action, which references the ID of the <amp-image-lightbox> element (i.e., lightbox1). The <amp-image-lightbox> then displays the image in the center of the full-viewport lightbox. Note that the amp-image-lightbox element must be empty and must be set to layout=nodisplay.
Among other things, the amp-image-lightbox allows the following user manipulations: zooming, panning, and showing/hiding the description. Pressing the escape key on a keyboard closes the lightbox.
You can use the same amp-image-lightbox for more than one image on the AMP page. Optionally, you can display captions at the bottom of the viewport for the image.
(d) amp-lightbox
Purpose→ amp-lightbox shows a zoomed image or text with a pop-up effect. When tapped on, the element comes to the center of the screen, giving the user a better and more extensive view.
Example: For form submissions, a ‘Are you sure you want to submit?’ message pops up on the screen when users hit ‘submit.’
Required Scripts→ <script async custom-element=”amp-lightbox” src=”https://cdn.ampproject.org/v0/amp-lightbox-0.1.js”></script>
Description→ The amp-lightbox component defines child elements that display in a full-viewport overlay/modal. When the user taps or clicks an element (e.g., a button), the amp-lightbox ID referenced in the clicked element’s attribute triggers the lightbox to take up the entire viewport and displays the child elements of the amp-lightbox.
Pressing the escape key on the keyboard or focusing on an element outside the lightbox closes the lightbox. Alternatively, setting the on attribute on one or more elements within the lightbox and setting its method to close shuts down the lightbox when the element is tapped or clicked. Once closed, the focus returns to the trigger element.
(e) amp-sidebar
Purpose→ amp-sidebar offers a smart way to display the outline of the main content that remains passively hidden until tapped. This AMP component helps display meta content like navigation, links, buttons, and menus.
Example: A sidebar creates an app-like navigational experience with items like additional recipes, promotional offers, and other content.
Required Scripts→ <script async custom-element=”amp-sidebar” src=”https://cdn.ampproject.org/v0/amp-sidebar-0.1.js”></script>
Description→ <amp-sidebar> hides meta content intended for temporary access (navigation links, buttons, menus, etc.). <amp-sidebar> can be opened and closed by button taps and tapping outside the amp-sidebar. However, optional attributes that accept media queries can display meta content in other parts of the site. Child <nav toolbar=”(media query)” toolbar-target=”elementID”> elements allow for content within the sidebar to be displayed on other parts of the main content.
- The sidebar can only appear on a page’s left or right side.
- The <amp-sidebar> may contain any valid HTML elements (supported by AMP).
- The
may contain any of the following AMP elements: - <amp-accordion>
- <amp-img>
- <amp-fit-text>
- <amp-list>
- <amp-live-list>
- <amp-social-share>
- The max height of the sidebar is 100vh. If the height exceeds 100vh, then a vertical scrollbar appears. The default height is 100vh in CSS and overridable in CSS.
- The sidebar width can be set and adjusted using CSS (minimum width is 45px).
- Touch zoom is disabled on the amp-sidebar and its mask when the sidebar is open.
- <amp-sidebar> is recommended to be a direct child of the <body> to preserve a logical DOM order (for accessibility) as well as to avoid altering its behavior by a container element. Note that having an ancestor of the amp-sidebar with a set z-index may cause the sidebar to appear below other elements (such as headers), breaking its functionality.
You can create a toolbar element that displays in the <body> by specifying the toolbar attribute with a media query and a toolbar-target attribute with an element id on an <nav> element that is a child of <amp-sidebar>. The toolbar duplicates the <nav> element and its children and appends the element into the toolbar-target element.
You will find detailed information here if you wish to learn more about the layout components.
4. Presentation components
Presentation components map out the display of text within an email. Using these components, you can adjust the font, size, color, and alignment of text, among other things. Let’s look at how text can appear in emails with the presentation components.
(a) amp-fittext
Purpose→ amp-fit-text expands or shrinks the font size to fit the content within the space specified. This AMP component is extremely useful for building a responsive design for varying screen sizes and devices.
Example: You can use this component to fix the width, height, minimum size, and maximum size of the text so that it scales to fit everything within the specified limits.
Required Scripts→ <script async custom-element=”amp-fit-text” src=”https://cdn.ampproject.org/v0/amp-fit-text-0.1.js”></script>
Description→ The amp-fit-text component allows you to manage the size and fit of text within a specified area. For content contained in an amp-fit-text element, the amp-fit-text component finds the best font size to fit all of the content within the available space. The expected content for amp-fit-text is text or other inline content, but it can also contain non-inline content.
If the content of the amp-fit-text overflows the available space, even with a min-font-size specified, the overflowing content is cut off and hidden. While overflowing content gets visually truncated to fit the container, note that it’s still present in the document. Do not rely on the overflow behavior to simply “stuff” large amounts of content on your pages – while visually it may look appropriate, it may lead to the page becoming overly verbose to users of assistive technologies (such as screen readers); as for these users, all the truncated content will still get read/announced in full.
You can style the amp-fit-text with standard CSS. In particular, you can use text-align, font-weight, color, and many other CSS properties, with the main exception of the font size.
(b) amp-timeago
Purpose→ amp-timeago component allows you to count up to, or away from, a specified date and time. The component replaces the text node with a fuzzy timestamp, such as ‘in 30 years’ or ‘3 hours ago.’
Example: You can use it to insert elements like timestamps or dynamic timers for updated ETA of order, time left for an event, etc.
Required Scripts→ <script async custom-element=”amp-timeago” src=”https://cdn.ampproject.org/v0/amp-timeago-0.1.js”></script>
Description→ The amp-timeago component requires a placeholder in the text node. The calculated timestamp replaces the placeholder once ready. Use the placeholder as a fallback to display to users if amp-timeago cannot process the fuzzy timestamp.
The required DateTime attribute sets the date and time. The value must be an ISO DateTime.
The locale attribute allows you to get an output in a different language. By default, the locale gets set to en(English). You can add the locale attribute and specify one of the 44 values (like el{Greek}, hi-IN{Hindi}, nl{Dutch}, etc.) to change the locale.
You will find detailed information here if you wish to learn more about the presentation components.
AMP components are the building blocks of AMP emails. Each component lets you add different appearances and functionalities to email, making it more interactive and engaging.
We have covered all the technical aspects of components needed to create interactive and dynamic AMP email campaigns. If you would like to read more on any of the above AMP components, visit amp.dev.
Things to consider before you jump onto the bandwagon
AMP emails can be a great way to improve customer engagement by making your emails more interactive and engaging however, there are a few challenges to executing AMP emails effectively. Before you get started with AMP for email, here are some points to consider.
Challenges with creating an AMP email
AMP email is quite advanced compared to regular HTML email and therefore requires specific skill sets. To create AMP emails, you must use AMP-specific codes, markup languages, HTML, CSS, and JavaScript.
Every AMP component has several attributes and rules you must understand and apply correctly. You might need to go a few experimental rounds before you perfect the coding for an AMP email.
Ensuring an HTML fallback option for AMP email
When building AMP emails, you need to add a third MIME part (Text / x-amp-HTML) in addition to HTML and plain text. This serves as an HTML or plain text fallback option wherever AMP email is not supported.
It is compulsory to build an HTML fallback as many MSPs do not support AMP emails. In such cases, the AMP part gets removed when forwarding the email, and the recipient gets to see a regular HTML/plain text email.
Getting the permissions for AMP email
Currently, only a few MSPs support AMP for email; first, you need to register and authenticate your sending domains with them. It is a one-time process that gets your domain whitelisted.
The registration process needs you to comply with a list of guidelines and requirements that may vary for each MSP. Visit the AMP guidelines page of each MSP to understand and comply with the prerequisites. You will find more details about the permissions in the next segment, ‘How do you go about creating an AMP email?’.
Finding an EMAIL SERVICE PROVIDER (ESP) that can handle AMP email
Not many ESPs can efficiently handle AMP for email: to support AMP emails, the ESP needs to be fully equipped for the job. Several coding components like tags, doctype declaration, etc., must be included to design the AMP email accurately. Besides creating a qualified AMP email, the ESP should be able to support the MIME part to send and receive AMP emails.
AMP emails also demand strict compliance with security requirements; therefore, finding the correct ESP that can support you with setup and integration formalities is crucial. Consider the legacy and expertise of the ESP in rolling out AMP email campaigns. Questions to ask would be, are they doing it on scale and at global levels?
How do you go about creating an AMP email?
When it comes to getting creative, an AMP email offers greater possibilities than an HTML email. You can include a range of functions like drop-down menus, sidebars, in-email form submissions, image galleries, and more within email. AMP emails can be highly engaging if done correctly. Here is all you need to know about creating an AMP email.
Get access from Google
The journey to send AMP emails requires you to cover some ground with Google first. Google has laid down guidelines and requirements that you must meet to send AMP emails successfully. Here are the steps you need to follow to use AMP for email within Gmail.
1. Build an AMP email
The journey begins with choosing and combining the AMP components. Pay extra attention while handling the authentication requests for AMP email creation.
Authenticating the user is often required when emails contain dynamic, personalized content. To authenticate requests made from AMP emails, you may use access tokens.
The email sender supplies and checks the access tokens. The sender uses the tokens to ensure that only those with access to the AMP email can make the requests contained within that email. Access tokens must be cryptographically secure and time- and scope-limited, and included within the URL of the request.
For example, when using <amp-form>, place your access token in the action-xhr URL.
<form action-xhr=”https://example.com/endpoint?token=REPLACE_WITH_YOUR_ACCESS_TOKEN” method=”post”>
<input type=”text” name=”data”>
<input type=”submit” value=”Send”>
</form>
2. Test the AMP email
Before sending the AMP email, you must test it in Gmail. Testing ensures that the dynamic email that you’ve created works as desired. You can test it to verify its contents and behavior.
There are two options for testing your dynamic emails in Gmail:
- Use Gmail’s AMP for Email Playground to draft AMP emails, see a live preview, and have your emails sent to your own Gmail account for testing.
- Navigate to Gmail Settings > General > Dynamic email and click Developer settings. It opens a dialog where you can whitelist an email address that can send you dynamic emails for testing purposes. The AMP version of emails sent from the listed address to your account is rendered, even if the email address is not registered with Google. It lets you test your dynamic emails on your accounts before registering to ensure they are working as expected.
For your AMP email to reach any account, it must meet the following conditions:
- The AMP for email security requirements include:
- Sender authentication
- DKIM alignment
- TLS encryption
- HTTP proxy
- CORS headers
- Restrictions
- The email must contain a fallback HTML version (text/HTML) or plain text version (text/plain) in addition to the AMP MIME part (text/x-amp-HTML). This fallback version gets shown when the AMP MIME part is not displayed, such as when the mail client is offline or 30+ days after Gmail received the email.
- The AMP MIME part must contain a valid AMP document.
- The email should include the AMP MIME part before the HTML MIME part.
- The From and To header fields of the email must contain different email addresses.
3. Register with Google
When you are ready to launch your dynamic emails to your users, you must register with Google by following these steps:
– Make sure that you meet all the guidelines and requirements listed below.
- You must send an actual, production-quality example email, not a demo or “Hello World” example.
- Emails must have a similar HTML or text MIME part. There are many instances where this is shown instead, such as when the user has disabled dynamic email.
- The email must have no bugs.
- You must authenticate your emails using SPF, DKIM, and DMARC as detailed in the security requirements.
- Ensure that you have reviewed the AMP for email best practices and that your email conforms to the suggestions.
- Registration works on a per-email basis. If you’d like to register more than one sender email, each sender needs to be registered separately, with a separate production-quality email sent.
- You must not allow third-parties, such as users or the general public, to author and send emails directly. The emails you send can contain user-generated content, such as posts or comments. Testing tools and “email playgrounds” can’t be whitelisted and should instead rely on the steps outlined in Test your AMP emails in Gmail.
- Emails must follow the Prevent mail to Gmail users from being blocked or sent to spam guidelines.
- A low rate of spam complaints from users.
– Send an actual, production-ready email from your production servers (or a server with similar SPF/DKIM/DMARC/From:/Return-Path: headers), including the dynamic email MIME part, to [email protected]. Google needs this to ensure you comply with all the guidelines and requirements. As you send this email, do the following:
- Make sure that the AMP version of the email is correct before sending the email by testing it in Gmail
- Send the email directly instead of forwarding it. Gmail removes AMP MIME parts when forwarding an email.
-Fill out the demo form and await Google’s response. Google aims to respond to most requests within five working days.
Your participation as a sender of a dynamic email is subject to compliance with the Prevent mail to Gmail users from being blocked or sent to spam guidelines, which are subject to change without notice. You are responsible for ensuring compliance with the current guidelines. Google can, at its discretion, revoke your participation at any time if abuse or policy violations occur. Google may request additional information during the registration process or after registration is complete to verify your compliance.
Gmail’s AMP rendering relies on modern browser features, which not all web browsers can support. On incompatible browsers, emails fall back to HTML. The tables below display the compatibility details with different browsers and mobile OS.
| |
How can Netcore help you effectively increase customer engagement and ROI with AMP emails?
Netcore empowers you to create AMP interactive emails coupled with the world’s most advanced AI-powered email delivery. It sends 18 billion emails/month for businesses across 12 countries. The expertise and experience in email deliverability and inboxing are unmatched.
Netcore offers an enterprise-ready AMP editor, which makes AMP email creation quick and easy. You can use the no-code drag-and-drop editor to quickly build engaging AMP emails. To customize the creation further, you can also connect with the in-house team of AMP experts that helps you design AMP emails for specific use cases.
At Netcore, we also help you with the setup and integration of AMP for email. You will find instant support for domain whitelisting, custom AMP design creation, and email delivery optimization that maximize ROI from your email marketing campaigns.
Netcore has helped 50+ global brands roll out interactive emails powered by AMP and achieve their goals. We work as an extension of your team to provide quick solutions. To know more, keep reading as the next segment details the achievements of brands that collaborated with Netcore to build interactive AMP email campaigns.
AMP success stories driven by Netcore
Netcore partners with your marketing team to help you leverage the power of AMP emails and drive business revenues.
Here are a few success stories of brands that have used Netcore’s AMP emails to improve their ROI. You will get actionable insights into the results you can achieve by reconstructing your marketing plan with AMP emails.
YourStory turns around its email marketing and increases conversions by a whopping 5.5X
YourStory’s marketing team leveraged the power of AMP emails with Netcore to skyrocket YourStory’s event registration numbers with AMP emails; here’s the link to the whole story.
Axis Securities increases its open rate by 27% and click rate by 24%
Axis utilized the unique capabilities of AMP to engage with the email recipients dynamically based on suggestions from Netcore’s team. Learn how the customer engagement rates shot up; here is the link to the complete story.
CaratLane increases the CTOR by 300% for their new product launch, “Borla”
CaratLane partnered with Netcore to incorporate interactive AMP emails for their new product launch. Learn how this approach boosted their conversions and ROI; here is the link to the entire story.
Several top-notch brands across industries and geographies partner with Netcore’s AI-powered email platform to uplift their email revenues and boost ROI through AMP emails. Our AMP email wizards consult and guide you to achieve your KPIs and email marketing goals.
Connect with us to understand how you can benefit from our expertise and experience.
Start leveraging AMP emails to drive customer engagement and increase the ROI
Now that you have understood how AMP emails can transform your marketing, here is what you can do next.
Learn more about the Netcore advantage
Netcore empowers you to create AMP interactive emails coupled with the world’s most advanced AI-powered email delivery. Its expertise and experience in email deliverability and inboxing are unmatched.
Netcore sends over 20 billion emails a month on behalf of businesses across 18 countries.
Start the right way with the initial requirements
Our AMP email wizards will consult to understand your business objectives and guide you. We believe in sharing your KPIs and email marketing goals.
At Netcore, we help you set up and integrate AMP emails in as few as 10 days. Our team will walk you through and offer assistance for domain whitelisting, custom AMP design creation, and email delivery optimization.
Create your first AMP email with Netcore
Netcore offers an enterprise-ready AMP editor and its no-code drag-and-drop capability lets you build engaging AMP emails in minutes.
If you want to customize further, our in-house team of AMP experts is always available to design AMP emails for your specific business use cases.
Connect with us
Netcore has helped 50+ global brands across industries and geographies roll out interactive AMP emails to achieve their business goals. You can book a quick demo to get a firsthand experience; fill out this short form, and our team will get in touch with you.
NOTE: AMP is an open-source library, and all scripts and descriptions, as well as further readings, have been referenced to amp.dev and linked accordingly.
