
How to Setup a Free SMTP with Sendblaster?

Published on 2019-10-03· Updated on 2023-09-06
The author voluntarily contributed this tutorial as a part of Pepipost Write to Contribute program.
Introduction
SendBlaster is an email software that allows bulk email solutions through mailing list management and email campaigns. It provides services like TrackReports, Newsletter creator, Mailing list manager to customize your bulk mails and track your campaign.
There are many SMTP providers which can be configured with SendBlaster to send emails. To list a few Mandrill, Sendgrid, TurboSMTP and many more. But, in this tutorial you will learn how to integrate your SendBlaster with Pepipost, which offers 30,000 emails free.
Key topics covered as a part of this tutorial:
- How to compose and send emails through SendBlaster?
- How to integrate Pepipost SMTP with SendBlaster?
- How to track emails in SendBlaster?
- How to set up unsubscribe option in your emails send through SendBlaster?
Prerequisites
- Latest version of Sendblaster installed on your desktop
- A user account with Pepipost. If you don't have one, click here to signup and get 30,000 emails free every month
- A fully qualified sending domain name
- A hosting server
- Your Pepipost SMTP credentials
How to send emails through Pepipost SMTP?
SendBlaster provides a WYSIWYG interface for email generation, which allows you to send highly customizable emails. You can add email templates, tags, scripts and much more using the email composer panel.
Step 1: Compose message
In this section, you will learn how to create an email and send it to recipients of your mailing list. (Learn more about the mailing list in the following sections)
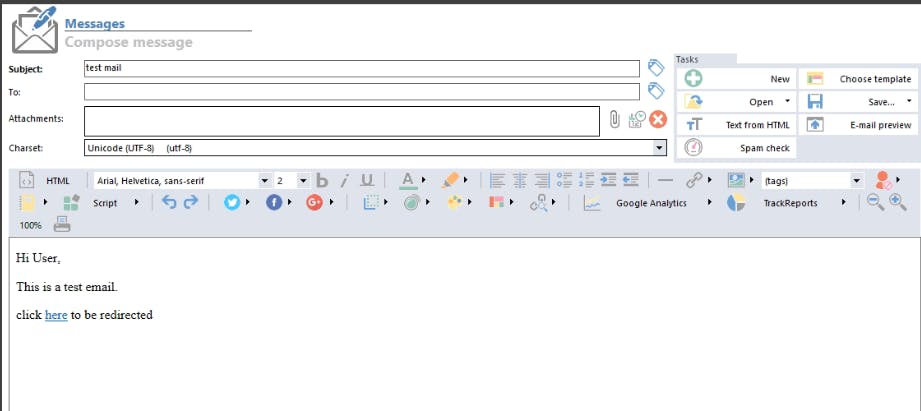
- To compose your email, find messages section in your navbar, and then click on [Messages] -> [Compose Message]. You will see an email editor opened.
- You can now create a test email template. To create a basic email template, add the following:
undefinedundefinedundefined - With this, your basic email structure is ready. Refer screenshot below to get a clear idea:
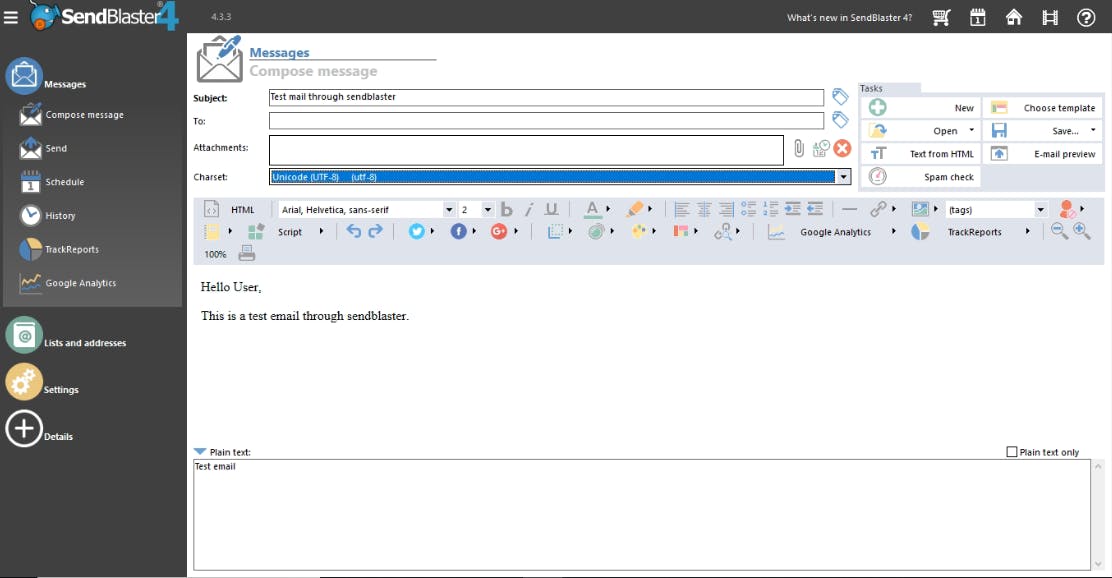
- You can preview your email body to make sure if everything looks all right by clicking on [Email preview]. You can find it on the top right corner of your editor.
Step 2: Create your mailing list (Optional Read)
You need to create a mailing list to send bulk emails. The mailing lists contain multiple email ids and are uniquely named. You need to specify the name of the mailing list at the time of sending the email.
To create a new mailing list, please follow the following steps:
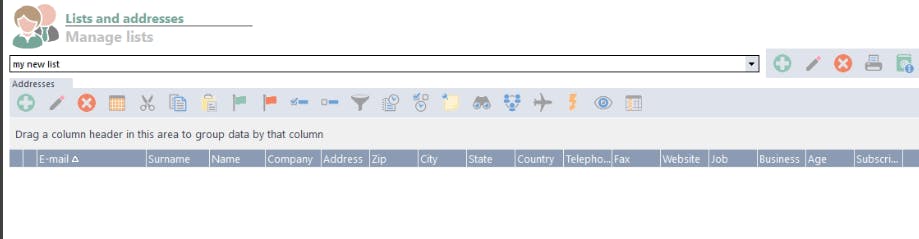
- Find Lists and addresses in the navbar
- Click on [Lists and addresses] -> [Manage lists]
- In the panel you’ve just opened, you will find the add button beside the dropdown. Click on it to add a new list.
- After this, you will be prompted to name your mailing list. So give it a recognizable name and press the ENTER key. Refer screenshot below for your reference.
- Now that your emailing list is ready, we need to add email ids to it.
- There are two ways to do that
1. Manually through the dashboard: To do this, In your Lists and addresses panel, click on the add button in the address section. This can be found below the list dropdown.
- A popup will open with multiple fields which represented in the image provided below:
- Fill these fields as per your convenience, and the only mandatory field is the email field so you can keep the rest of the fields as blank.
- Click Save, and with this, you have successfully saved the user details into the lists panel.
- This is mostly recommended when you want to insert a couple of emails into an already existing list.
- But if you have a massive email list, this process might become cumbersome and tiring. For a sizeable mailing list, it is recommended to use the import feature to import all of your emails through a CSV file that is explained in the next step.
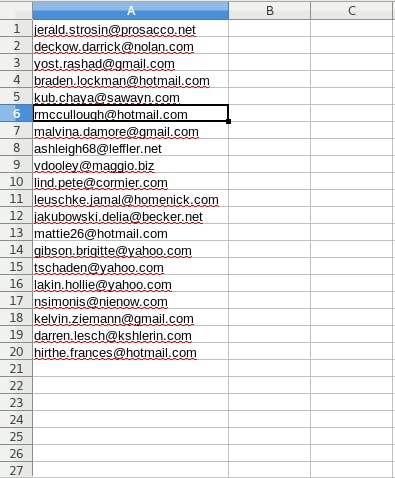
2. Importing through CSV:
There are several ways you can populate your mailing list using CSV import. One way you can easily do that is by exporting the email list from your email account. Please click here for more information on that.
Please follow the below steps to learn how to create a basic list: - Create a CSV file with an email list you want to insert. Refer below screenshot for the CSV file structure:
- Click on [Lists and addresses] -> [Import]
- You can select a mailing list from the dropdown menu in which you want to import the email list
- Below the lists dropdown, you will see two radio box section, for importing current list we will keep the default settings, you can change these options according to your requirements.
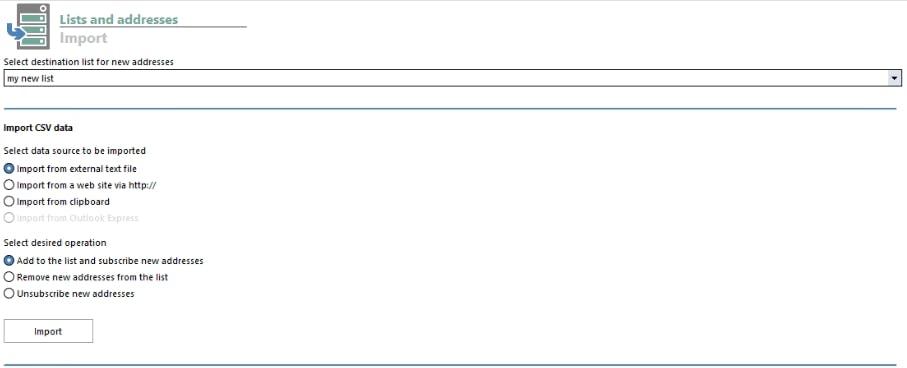
- Click on import
- You will be prompted to select the import file, so browse and select your emailing list CSV file that we had created.
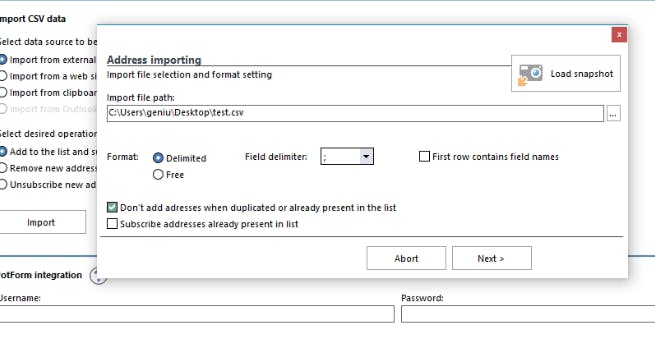
- Click next, and you will see the email dropdown being populated with an email id you’ve specified in your CSV file. Verify and select the email id and click next.
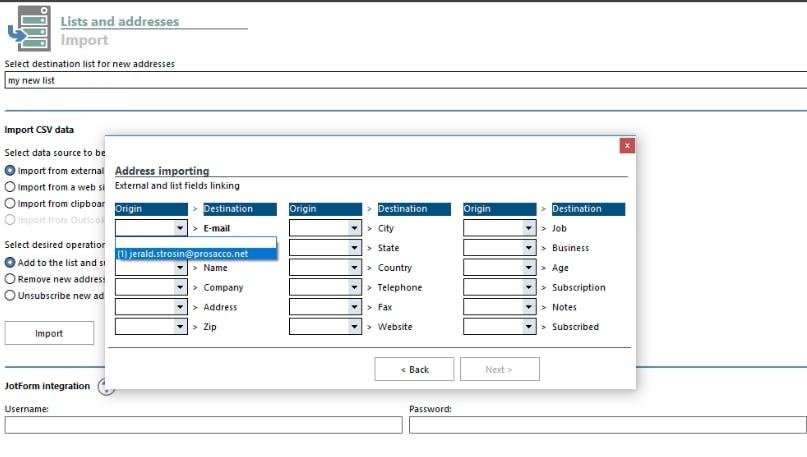
- After this, your email ids will be populated in your email list.
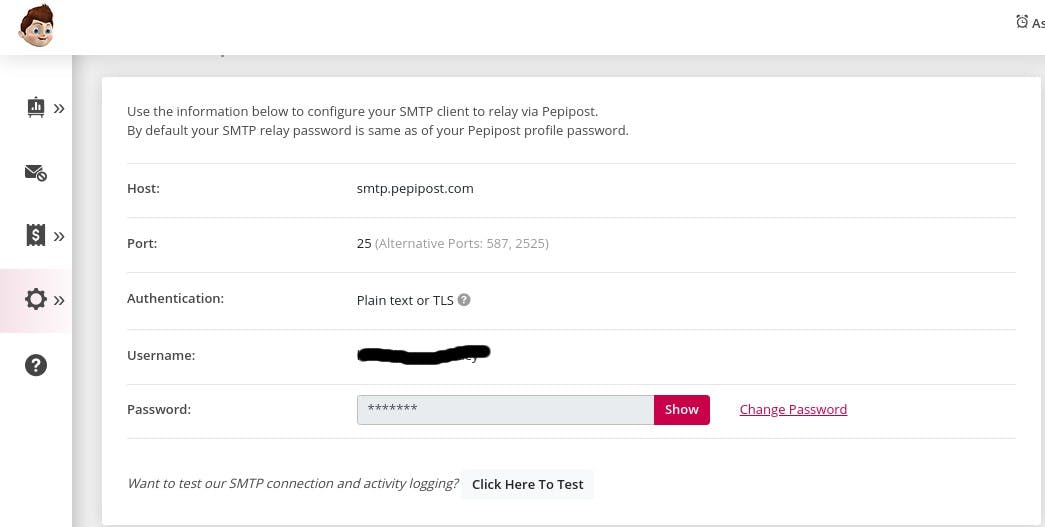
1. Acquiring Pepipost SMTP credentials:
For the SMTP integration, we will need our Pepipost SMTP credentials which can be found by following these steps:
- Log in with your user credentials on Pepipost application
- Open the SMTP integration panel by following this link
- You will find your SMTP credentials in SMTP Relay tab as shown in the image:
2. Updating SMTP credentials in Sendblaster panel
- Click on [Messages] -> [Send]
- Select your mailing list from the first dropdown
- Add your sending address in [Sender email address] field. This the <From-address> for your email.
Note: Since you're using Pepipost SMTP, it is mandatory that the domain of the [Sender email address] should be your verified domain registered within your Pepipost account e.g. if your sender email address is [email protected], then example.com is the domain that needs to be added and verified as a Sending Domain under your Pepipost account. - Now in your "Send settings" section, select [Use SMTP server] option.
- Now populate the SMTP fields with their respective fields that we have found in our Pepipost SMTP panel in the previous step.
- The end result would look similar to the given screenshot:
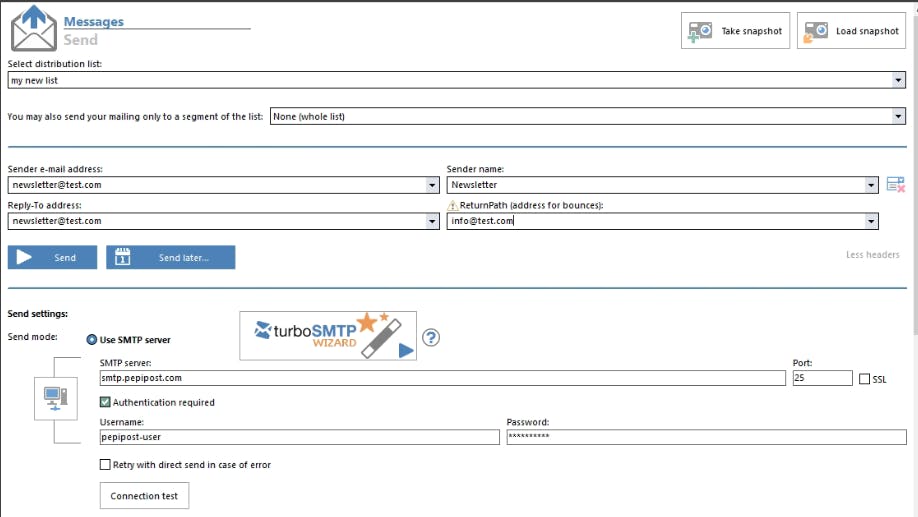
- And with this setup, you can send bulk emails using Pepipost SMTP integration by selecting your email list and clicking on the send button.
How to track emails in SendBlaster
Once the emails are delivered, SendBlaster allows for tracking your emails activity in real-time. For advanced tracking, you can refer to the Pepipost dashboard. Here are the steps:
Step 1: Create an account with TrackReports
- TrackReports is an email tracking web service which is integrated with SendBlaster.
- If you don’t have a user account with TrackReports click on [Trackreports] -> [Register] and create your new user account by filling the necessary credentials in the registration form.
Step 2: Installing Mytracking script
- Mytracking is a small PHP script which acts as an interlink between your email event and your TrackReports account
- You will need a hosting server for following these steps to setup Mytracking
- Click here to download the Mytracking script
- After unzipping the Mytracking.zip file, you will find mytracking.php file
- You can upload this file in your hosting server anywhere you want, all we want is a URL pointing to the mytracking.php in your hosting server
- Please change the file name to something other than mytracking.php before the implementation.
For example: After changing the filename from mytracking.php to trk.php, the link might look something like this:
https://<your-domain-name>/trk.php
- The installation is completed. To verify your installation, access your Mytracking URL in the browser, and you will see a Mytracking image indicating the proper installation.
Step 3: Specifying the Mytracking file path in the email composer
You need to add the Mytracking path to the composer to do three things
- Recognize your tracking request source
- Create tracking links for all of the links you will be provided in your email
- Attach tracking pixel into the emails
To do that, follow these steps:
- Open compose message panel by clicking on [Messages] -> [Compose message]
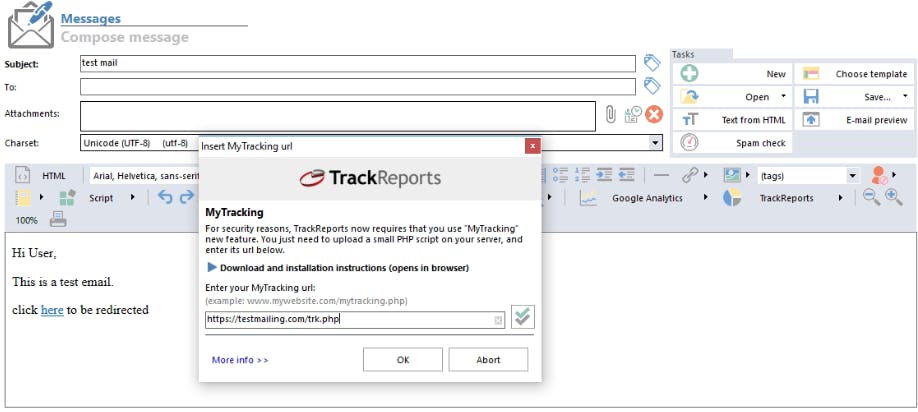
- First, using the editor link option add a sample link where you want the user to get redirected. Refer the image below for your reference.
- Now to track, the emails click on [TrackReports] option
- A popup will open prompting you to Enter the link to the Mytracking file URL in your hosting server, enter the URL.
- Now you can verify the URL by clicking on the green arrow icon and after your URL verification click on next.
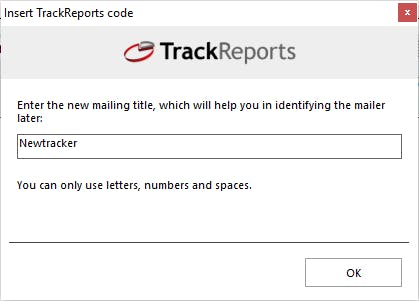
- Now you will be asked to create a new tracker list or select an existing tracker list. Select [Create a new mailing] click on next.
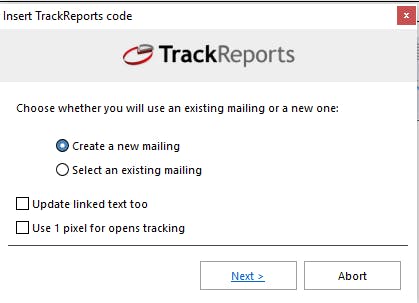
- Enter an identifiable tracking name into the text field and click on ok.
- You have now successfully set up your tracking URL, and you will see Mytracking logo at the bottom of your email body indicating the email tracking is active on your emails.
Send a test email and create some tracking events by opening the emails and clicking on the link in the email body.
Step 4: Check your tracked email events
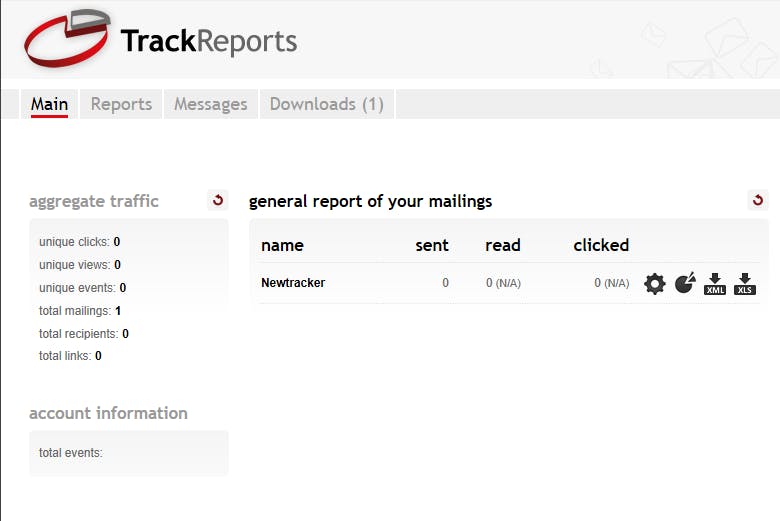
- Click on [Messages] -> [Track reports]
- Login with your registered credentials
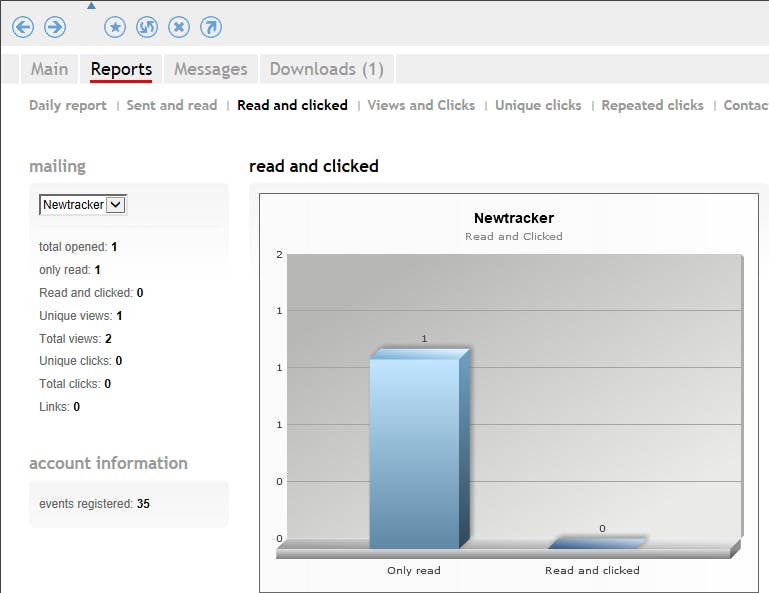
- After the login, you will be on the main dashboard where you will find the list of tracking names as you can see in the screenshot:
- Click on the pie icon, and you will be redirected to the tracking panel where you can check your email activity status
How does it work?
- Every email you send is embedded with a pixel image which is hosted on the Trackreports server and when the receiver receives the email and opens it, the request to download the image is made, and Trackreports uses that information to track email activity.
- But any request made to the Trackreports server should be made through the Mytracking script on your server. Once the request is sent to the Trackreports, it identifies and verifies the source of the request and then responds with the appropriate action back to the Mytracking script.
- It has the same process for tracking the clicks. Every clicked link is first redirected to your Mytracking file and then redirected to the specified link to the intended URL.
If you see inside the source code, by clicking on the HTML option on the left corner of the email editor, you will find a link that will look similar to this:
https://<your-domain-name>/<your-mytracking-php-file-path>?hop=<encoded-data> - A hop parameter is passed to your Mytracking php file. This hop is nothing but an encoded version of the Redirection link/Pixel image. After this call, your Mytracking php file will request for the appropriate source and action from TrackReports, this setup is done to make secure requests to the TrackReports service and to avoid spam.
Step 5: Tracking with Pepipost
There is no need to do a setup for tracking with Pepipost. But, if you want to track on both SendBlaster and Pepipost, then you have to make sure click tracking is also enabled on Pepipost.
Please follow these steps:
- Login to the Pepipost app
- Open sending domains panel by clicking here
- Click on [View Settings]
- Find the [Tracking Settings] section, here you can enable or disable tracking from Pepipost.
- You can check out the live feeds from Pepipost panel here.
How to set up an unsubscribe option in your email
This setup is optional since the emails sent through Pepipost already consists of an unsubscribe link in the emails by default. If you want to use Sendblaster’s unsubscription link, you will have to follow these steps.
- Remove the Pepipost unsubscribe link from the email body to avoid duplicate links.
- Login to pepipost app
- Open email settings by following this link
- Find [Unsubscribe Text HTML] option
- Remove the code inside the HTML editor and click on save.

- Installing 1CU:
- 1CU stands for 1 Click Unsubscribe download the zip file here
- After unzipping 1cu.zip, you will find 1cu.php file, rename the file to anything other than 1cu.php
- Upload this file to your hosting server at any location you want, and make sure this file is accessible via a public URL pointing to that file.
- To check the installation of the file we uploaded, open the URL path of the file in the browser and check the response. It should print “OK”.
- For example, if your renamed file name of 1cu.php is unsub.php, the URL should look similar to this
https://<your-domain-name>/unsub.php - Adding 1cu file path in the compose email:
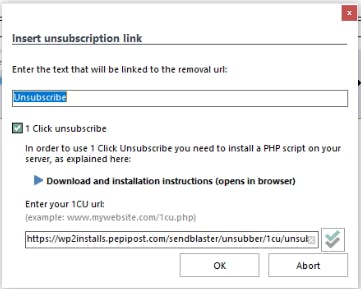
- Click on [Compose message] -> icon.
- A popup will open, Enter the text for the unsubscribe message.
- Click on [1 Click unsubscribe] checkbox:
- Insert your 1cu file path we had uploaded in the previous step, in the text field and click on the green tick button to verify your installation
- Click OK.
- You will now see the unsubscribe link is being generated on the bottom of your email.
- Adding your POP3 mail account credentials:
- Click on [List and addresses] -> [Manage subscriptions]
- Enter the email id that you want to receive your unsubscription emails to
- Set your POP3 server / Username and Password
- And you are all set to receive unsubscriptions into your dashboard that you can download in this panel
- The panel reads the emails from your mentioned POP server and will list all the emails that come from that particular email address with unsubscribe in their subject line, and they will be automatically removed from the mailing list.
Conclusion
By following this tutorial, hope you are now able to use SendBlaster with Pepipost SMTP service. And, you're able to track your emails in real-time and manage your subscription list with ease.
Grade My Email
Check your spam now?
Netcorecloud's toolkit is the solution to all your email problems.


You can also explore
Netcore connects & unifies your data across all sources, connects to your marketing channels and provides you with control over AI Powered automation and personalization.


Deploy emails that are
screenshot worthy!

Unlock the Secrets of Your Domain, Discover Limitless Possibilities! ✨
Get a Free Domain Health Check Now!
Hitesh Pandey💻
Full Stack Developer, Pepipost
🥑 Developer Evangelist | 🥇Email Geek