

Introduction
Mautic is a popular open-source marketing automation application which is used for multiple marketing paradigm right from creating templates for sending emails to building campaign, sending SMS to creating user journey. Mautic has always helped marketers to build their brand with easy. Mautic has been planning to make this experience more smooth with upgrading its platform from Mautic 2 to Mautic 3 which will be released soon by the end of the month.
This tutorial will help you to install and configure SMTP in Mautic.
Prerequisites
- A new server where mautic will be installed.
- A Pepipost account (SMTP username and password).
- A Mautic setup.
- Installing Mautic on the server.
Step 1: Setting up a new server for Mautic.
Mautic is more powerful if it is hosted on a cloud server having a decent configuration. There are various famous cloud providers like Amazon's AWS, Digital Ocean, Microsoft's Azure, Linode and many similar.
The simplest installation you can do for mautic is either setting up a new server on Digital Ocean or Linode.
if you want to install mautic on Digital Ocean you can check here.
Step 2: A Pepipost account.
Setting up an email configuration is easy and simple for that you need an SMTP username and password. you can use any email service provider all we need is username and password for sending emails. In this tutorial, we will be using Pepipost as an Email service provider.
a. Login into your pepipost account. ( If you don't have an account Sign up now with Pepipost and get your 30,000 emails free)
b. Once you are done with the account setup you need to configure the domain with pepipost and verify your SPF and DKIM.

c. Grab your SMTP username and password by switching tab to Settings -> Integration -> SMTP username & password.
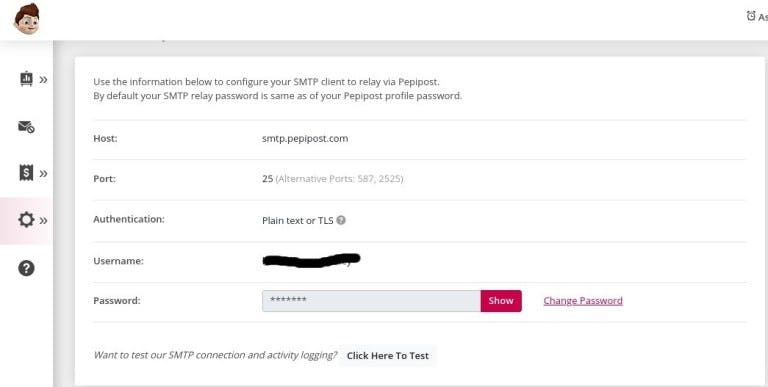
Save this above username and password for setting up SMTP configuration further with Mautic.
Step 3: Downloading Mautic zip.
1. Enter into the root directory of your remote server
$ cd var/www/html/
2. Create a new directory named Mautic
$ sudo mkdir mautic
$ cd mautic
3. Download the Mautic production file package
To download Mautic at your local machine click here
Fill your credentials and click on the download button
The downloaded file would be named something like this 2.15.3.zip
4. Copy the zip file to the remote server
Enter the following commands in your local machine download file location
$ scp -r 2.15.3.zip root@<your-domain-name/ip-address>:/var/www/html/mautic/mautic.zip
Note:- By any chance you don't have access to copy files to your server directory you can use FTP to upload the zip file, or you can use the git repo to clone it to your server directory, but you have to take some additional steps to get it up and running. Check this link for Mautic git repo.
5. Unzip the file contents
$ sudo unzip mautic.zip
If you don't have to unzip installed you can install it by using
$ sudo yum install unzip
6. Delete the zip file
$ sudo rm -rf mautic.zip
Step 4: Installing Mautic.
Once you are done with downloading Mautic zip you can installing by following below one of the points depending on the OS you have installed on your server.
1. Installing Mautic on Ubuntu.
2. Installing Mautic on CentOS.
3. Installing Mautic using Docker.
4. Everything about Mautic.
Step 5: Configure SMTP settings.
You need to use the SMTP username and password that you have saved earlier from Pepipost Account. For Mautic SMTP configuration, Switch to setting tab (click on the extreme right corner after your profile name) -> click for configuration -> select Email settings.
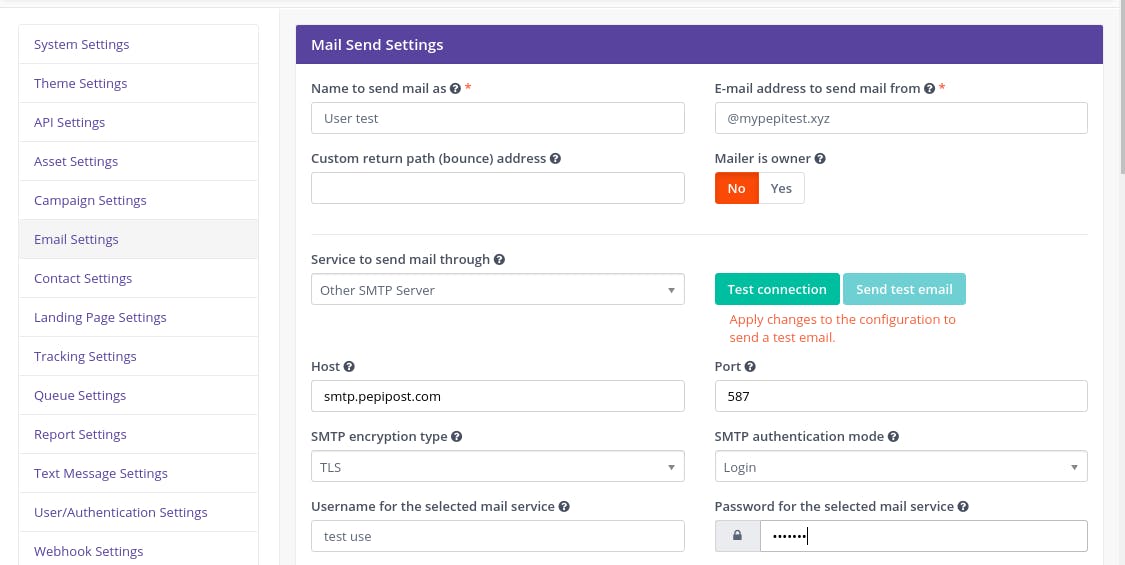
Set your credentials has below:
Service to send mail through Other SMTP servers
Host: smtp.pepipost.com
Post: 587 (highly recommended way of sending an email)
SMTP encryption type: TLS (encrypted way of passing email from server to server)
SMTP authentication mode: Login
Username for the selected mail service: your Pepipost SMTP username
Password for the selected mail service: your secret Pepipost SMTP password.
Once you are done with the setting just test your connection by clicking the Test connection button.
The above configuration will allow you to send emails through Pepipost using Mautic.
Conclusion:
Mautic helps you send different emails based on your campaign and tags with different SMTP configurations. By following the above-mentioned steps you are now ready to send emails through the Mautic platform. You are now able to upload an email list, create an email body, filter the email leads with segments and send emails using the Pepipost SMTP server.
Grade My Email
Check your spam now?
Netcorecloud's toolkit is the solution to all your email problems.


You can also explore
Netcore connects & unifies your data across all sources, connects to your marketing channels and provides you with control over AI Powered automation and personalization.


Deploy emails that are
screenshot worthy!

Unlock the Secrets of Your Domain, Discover Limitless Possibilities! ✨
Get a Free Domain Health Check Now!

Vikram Sahu 🦉
Developer Evangelist, Pepipost
💻 Senior Software engineer → 🥑 Developer Relations guy → 🤓 Building Community for Email Geeks 🎟 → Speaker 🎙