
[Complete Guide] How to Install Sendmail Server on Centos 7?

Published on 2019-08-08· Updated on 2024-01-25
The author voluntarily contributed this tutorial as a part of Pepipost Write to Contribute program.
Introduction
Sendmail is an MTA (Mail Transfer Agent) that uses SMTP protocol for sending email. Although it has been replaced by postfix in modern RHEL versions, it is still widely used in RHEL version 5 or earlier. Most system administrators recommend Sendmail over other MTAs.
Prerequisites before you install Sendmail Server on Centos 7
It is highly recommended to have root privileges to perform the below steps:
Step 1
To add the CentOS 7 EPEL repositories, simply open your terminal and paste the following command:
sudo yum install epel-release
Step 2
To install Sendmail with its dependencies, use the yum package manager.
sudo yum install sendmail sendmail-cf m4
(Note: m4 is a macro processor that you need to use to compile Sendmail configuration file. )
After the installation is completed, you will receive an output similar to the below:
Transaction Summary
=================================================
Install 3 packages
Total download size: 1.2 M
Installed size: 3.1 M
Is this ok [y/d/N]: y
Downloading packages:
(1/3): sendmail-cf-8.14.7-5.el7.noarch.rpm                                                                                                        | 186 kB  00:00:00
(2/3): m4-1.4.16-10.el7.x86_64.rpm                                                                                                                | 256 kB  00:00:00
(3/3): sendmail-8.14.7-5.el7.x86_64.rpm                                                                                                           | 736 kB  00:00:01
-------------------------------------------------------------------------------------------------------------------------------------------------------------------------
Total                                                                                                                                    888 kB/s | 1.2 MB  00:00:01
Running transaction check
Running transaction test
Transaction test succeeded
Running transaction
  Installing : m4-1.4.16-10.el7.x86_64                                                                                                                               1/3
  Installing : sendmail-8.14.7-5.el7.x86_64                                                                                                                          2/3
  Installing : sendmail-cf-8.14.7-5.el7.noarch                                                                                                                       3/3
  Verifying  : sendmail-8.14.7-5.el7.x86_64                                                                                                                          1/3
  Verifying  : sendmail-cf-8.14.7-5.el7.noarch                                                                                                                       2/3
  Verifying  : m4-1.4.16-10.el7.x86_64                                                                                                                               3/3
Installed:
  m4.x86_64 0:1.4.16-10.el7                          sendmail.x86_64 0:8.14.7-5.el7                          sendmail-cf.noarch 0:8.14.7-5.el7
Complete!
OR
rpm -qa | grep sendmail
Step 3: Configure Sendmail Server
Before directly editing /etc/mail/sendmail.mc for configuration we need to understand why this important file exists in the /etc/mail directory.
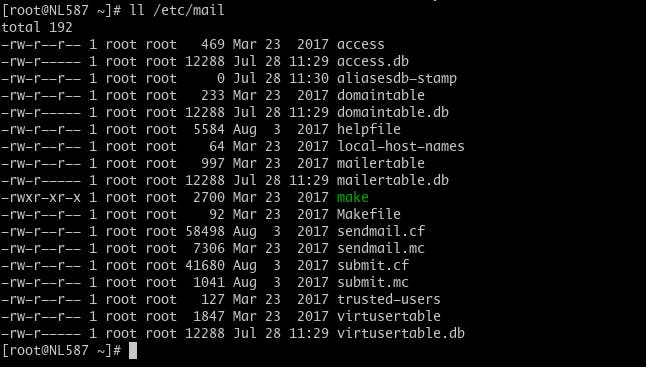
- access: used to allow or deny other systems to use Sendmail for outbound emails.
- domaintable: used for domain name mapping for Sendmail.
- local-host-names: used to define an alias for a host.
- mailertable: used to override routing for particular domains.
- virtusertable: allowing multiple virtual domains to be hosted on one machine.
To make the necessary modifications in the sendmail.mc file, use the command provided below:
vim /etc/mail/sendmail.mc
define(`SMART_HOST', `smtp.gmail.com')dnl
Note: Set your SMTP hostname above
#Add the below two lines in your sendmail.mc file to listen on port 465 and 587:
define(`RELAY_MAILER_ARGS', `TCP $h 587')dnl
define(`ESMTP_MAILER_ARGS', `TCP $h 587')dnl
#Uncomment the below lines:
TRUST_AUTH_MECH(`EXTERNAL DIGEST-MD5 CRAM-MD5 LOGIN PLAIN')dnl
define(`confAUTH_MECHANISMS', `EXTERNAL GSSAPI DIGEST-MD5 CRAM-MD5 LOGIN PLAIN')dnl
#Add the below lines:
FEATURE(`authinfo', `hash /etc/mail/auth/client-info.db')dnl
FEATURE(`access_db', `hash -T<TMPF> -o /etc/mail/access.db')dnl
DAEMON_OPTIONS(`Port=smtp, Name=MTA')dnl
#Uncomment for Sendmail to listen on port 587
DAEMON_OPTIONS(`Port=submission, Name=MSA, M=Ea')dnl
#Uncomment for Sendmail to listen on port 587
DAEMON_OPTIONS(`Port=smtps, Name=TLSMTA, M=s')dnl
#Mention your domain and uncomment
MASQUERADE_AS(`mydomain.com')dnl
Save and exit the file.
Step 4: Make Auth Directory
You need to assign the appropriate permissions to create an auth directory inside /etc/mail.
sudo mkdir /etc/mail/auth
cd /etc/mail/auth
Create a new file client-info and below auth in the file.
vim client-info
AuthInfo:gmail.com "U:username" "P:password" "M:PLAIN"
AuthInfo: "U:username" "P:Password" "M:PLAIN
makemap -r hash client-info.db < client-info
Add your relay IP
vi /etc/mail/access
Connect: [your-ip ] RELAY
# Check the /usr/share/doc/sendmail/README.cf file for a description
# of the format of this file. (search for access_db in that file)
# The /usr/share/doc/sendmail/README.cf is part of the sendmail-doc
# package.
# If you want to use AuthInfo with "M:PLAIN LOGIN", make sure to have the
# cyrus-sasl-plain package installed.
# By default we allow relaying from localhost...
Connect:localhost.localdomain RELAY
Connect:localhost RELAY
Connect:127.0.0.1 RELAY
Step 5: Recompiling Sendmail Configuration
To update the Sendmail configuration, compile the /etc/mail/sendmail.mc file using the m4 macro processor.
sudo m4 /etc/mail/sendmail.mc > /etc/mail/sendmail.cf
OR
sudo make -C /etc/mail
After recompiling, restart the service by using the command provided below.
sudo service sendmail restart
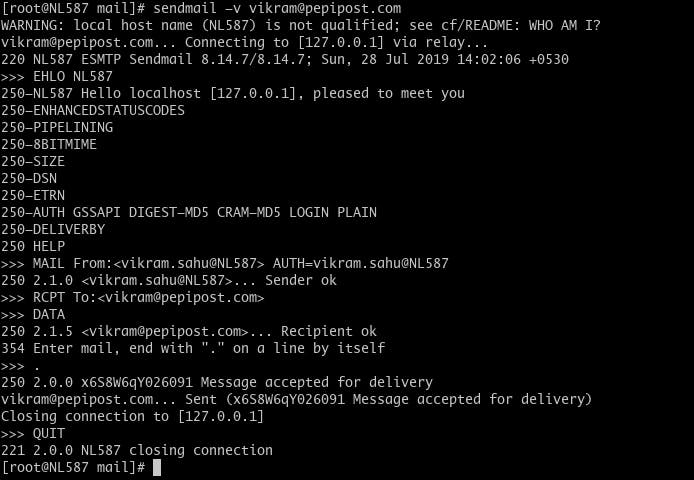
Step 6: Send Your First Email
sendmail -v [email protected]
Common Errors and Exceptions
#Error 1:
Disabling HOST statistics file(/var/lib/sendmail/host_status).
Creating /etc/mail/sendmail.cf...
Creating /etc/mail/submit.cf...
Informational: confCR_FILE file empty: /etc/mail/relay-domains
Informational: confCT_FILE file empty: /etc/mail/trusted-users
Updating /etc/mail/access...
Updating /etc/mail/aliases...
WARNING: local host name (ixtmixilix) is not qualified; see cf/README: WHO AM I?
This warning occurs when your hostname/domain name is not mapped to your server. To fix the issue, use the command below to set your hostname to a registered domain.
hostnamectl set-hostname my.new-hostname.server
#Error 2: Sendmail Error 550 5.1.1 “User Unknown”
'550 5.1.1 User unknown' is a common error when sending emails to Exchange/Recipient servers. This error occurs when the recipient server has a problem that prevents the delivery of these emails. It can happen with Sendmail, postfix, Exim, and other servers.
Possible reasons for this issue:
1. Wrong Recipient address or Unrouteable address
2. The sender would get a bounce message ‘550 5.1.1 User unknown’ if the recipient's mailbox is unavailable or the recipient rejected it.
By following the above steps, you can easily install and configure Sendmail Server on your Centos 7 system. It is important to update your system's package index and edit the sendmail.mc file to configure Sendmail properly.
We are a community of email enthusiasts. If you have further queries, feel free to drop an email to [email protected], and we would be happy to help you.
<!-- Happy Coding />
Excited about the latest in Bulk Email Marketing! Check out this insightful blog on Gmail and Yahoo updates in the email marketing landscape.
Explore the Blog - Here
Stay ahead of the game with valuable insights on optimizing your email campaigns! 📬
Grade My Email
Check your spam now?
Netcorecloud's toolkit is the solution to all your email problems.


You can also explore
Netcore connects & unifies your data across all sources, connects to your marketing channels and provides you with control over AI Powered automation and personalization.


Deploy emails that are
screenshot worthy!

Unlock the Secrets of Your Domain, Discover Limitless Possibilities! ✨
Get a Free Domain Health Check Now!

Vikram Sahu 🦉
Developer Evangelist, Pepipost
💻 Senior Software engineer → 🥑 Developer Relations guy → 🤓 Building Community for Email Geeks 🎟 → Speaker 🎙