

Introduction
Mautic is a very popular email marketing and lead management software that can be used to create customized email templates and email campaigns. With the release of Mautic 3 you can now expect better performance and some changes in code structure. So here are the detailed steps you need to follow to install Mautic 3 on your Linux server - Ubuntu 18.04.
You might need this release tutorial in order to get your self familiar with the new Mautic 3 although not much has been changed in the UI or you can use this as a debugging took so as to contribute to the Mautic 3 development and testing phase. For more about contribution to Mautic follow the Mautic community here.
Note:- As of the publishing date of this article, Mautic 3 is still in beta testing phase and a lot of new developments might be done in the future releases, considering that, this article is subject to change as the new release of Mautic 3 arrives in future. The version we will be working on will be the Mautic 3 beta version.
Prerequisites
- PHP 7.2.21 + (Magic Quotes GPC off)
- MySQL 5.7 + (InnoDB support required)
- Apache / Nginx
- An SMTP service provider like Pepipost

Installation
Step 1: Enter into the root directory of your remote server
$ cd var/www/html/
Step 2: Create a new directory named Mautic
$ sudo mkdir mautic
$ cd mautic
Step 3: Download the Mautic 3 beta file package
To download Mautic at your local machine click here
Fill your credentials and click on the download button
The downloaded file would be named something like this mautic-3.0.0-beta.zip
Step 4: Copy the zip file to the remote server
Enter the following commands in your local machine download file location
$ scp -r mautic-3.0.0-beta.zip root@<your-domain-name/ip-address>:/var/www/html/mautic/mautic.zip
You can also install Mautic through using git and composer by following these steps(skip all steps till now):
$ git clone -b 3.0.0-beta https://github.com/mautic/mautic.git mautic
$ composer install
Step 5: Unzip the file contents
$ sudo unzip mautic.zip
If you don't have unzip installed, you can install it by using
$ sudo apt-get install unzip
Step 6: Delete the zip file
$ sudo rm -rf mautic.zip
Step 7: Install php-fpm and dependencies
$ sudo apt install php72 libapache2-mod-php72 libapache2-mod-php72 php72-common php72-mbstring php72-xmlrpc php72-soap php72-gd php72-xml php72-intl php72-tidy php72-mysql php72-cli php72-mcrypt php72-ldap php72-zip php72-curl php72-sqlite3
Step 8: Setting up MySQL
- Install MySQL server
$ sudo apt install mysql-server
- Set MySQL root password
- After the installation a temporary password will be generated in the mysqld.log file you can access this password by the following command
$ sudo grep 'temporary password' /var/log/mysqld.log
- Now you will get a message something like this
[Note] A temporary password is generated for root@localhost: ,b*-rkuIR4Zas
- Copy this password for the next step
- Enter this command
$ sudo mysql_secure_installation
- This will prompt you to validate your password enter Y
- After this, you will be prompted to set your password strength. Enter you choice between LOW, MEDIUM and STRONG.
- Enter new password
- You can say yes to all the other prompts that come after this
- You will now be prompted with multiple questions on how to set up the MySQL installation. You can set Y to all the prompts
- You will be able to login with the user root and a blank password
- Login to MySQL
- Create Mautic database and add User
mysql > create database mautic;

mysql > CREATE USER 'mauticuser'@'localhost' IDENTIFIED BY 'password';

mysql > GRANT ALL PRIVILEGES ON * . * TO 'mauticuser'@'localhost';

mysql > FLUSH PRIVILEGES;

mysql > exit;
Step 9: Setting up Http Server
(You can install Nginx or Apache server according to your needs)
- Nginx:
- For installing Nginx you can follow these steps
$ sudo apt install nginx
$ sudo systemctl start nginx
$ sudo systemctl enable nginx
- You need to make the following changes to nginx.conf file
$ vim /etc/nginx/nginx.conf
server {
        listen       80 default_server;
        listen       [::]:80 default_server;
        server_name  <Your domain name>;
        root         /var/www/html/mautic;

        location / {
                try_files $uri /index.php$is_args$args;
        }

        location ~ \.php$ {
        fastcgi_pass unix:/run/php/php7.2-fpm.sock;
        fastcgi_index index.php;
        fastcgi_param SCRIPT_FILENAME $document_root$fastcgi_script_name;
        include fastcgi_params;
        fastcgi_split_path_info ^(.+.php)(/.+)$;
        }
    }
Now depending upon your php-fpm setup you either need to add
fastcgi_pass 127.0.0.1:9000;
Or
fastcgi_pass unix:/var/run/php7.2-fpm.sock;
Note: If you are unclear on which value has to be set, you can check this in www.conf file.
$ sudo vim /etc/php/7.2/fpm/pool.d/www.conf
Search for the listen parameter.
- Apache:
- For installing Apache you can follow these steps
$ sudo apt install apache2
$ sudo systemctl start apache2
$ sudo systemctl enable apache2
- You need to make the following changes to apache2.conf file
$ vim /etc/httpd/conf/httpd.conf
<VirtualHost *:80>
DocumentRoot /var/www/html/mautic
<Directory />
        Options FollowSymLinks
        AllowOverride All
    </Directory>
    <Directory /var/www/mautic>
        Options FollowSymLinks MultiViews
        AllowOverride All
        Order allow,deny
        Allow from All
    </Directory>
</VirtualHost>
After this you will be opening http://<your-domain-address>/ to open Mautic installation panel
Step 10: Setting folder permissions
You may get this error if some folder permissions are not set
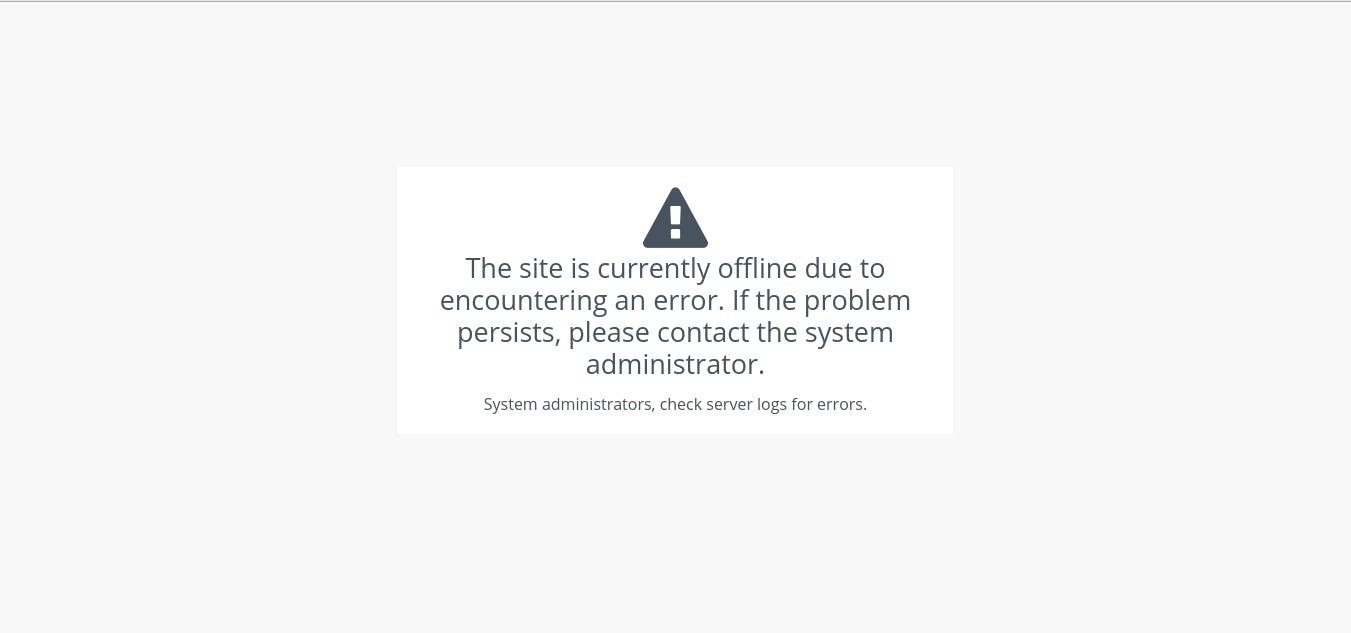
This error might exist because your Mautic folder user group is not the same as your running php-fpm instance.
Depending upon your user group you can set the following permissions.
Run the following commands to set permissions for Mautic installation
If your php-fpm user group is www-data
$ sudo chown -R www-data:www-data /var/www/html/mautic/
If it is nginx you have to set permissions like this
$ sudo chown -R nginx:nginx /var/www/html/mautic/
And for user group apache add
$ sudo chown -R apache:apache /var/www/html/mautic/
You can check user group of php-fpm file by using
$ ps -ef | grep fpm
Or you can check php-fpm config file by
$ sudo vim /etc/php/7.2/fpm/pool.d/www.conf
In this file check the user option
Set the Mautic directory permission
$ sudo chmod -R 755 /var/www/html/mautic/
Note: Also make sure that your PHP session path folder should also be added to the user group
$ vim /etc/php-fpm.d/www.conf
In this file check the php_value[session.save_path] attribute
Even by following the above steps you are still having issues use the following commands (For Apache users only)
sudo chcon -t httpd_sys_rw_content_t /var/www/html/mautic/app/logs -R
sudo chcon -t httpd_sys_rw_content_t /var/www/html/mautic/app/cache -R
sudo chcon -t httpd_sys_rw_content_t /var/www/html/mautic/app/config -R
Make sure you have all the PHP dependencies installed
Now you can go back to the browser and refresh the window and hopefully you have solved this error. If you are still getting the error screen you can try to debug using the Nginx error logs at.
/var/log/nginx/error.log
Setup
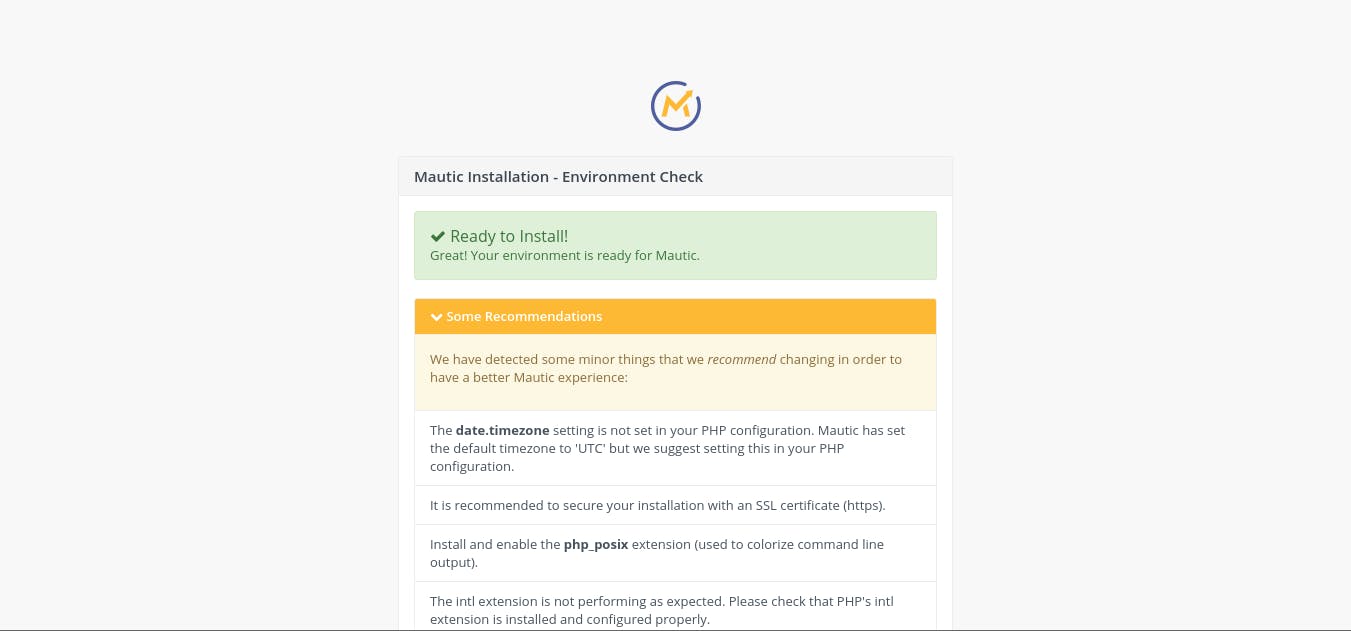
If you haven’t yet set up Mautic, you will be redirected to the installation panel.
If all the dependencies are matched for the installation of Mautic you will be shown a Ready to install prompt on the screen, Else the dependencies that are not satisfied will be listed on the panel.
If there are any minor bugs that need to be fixed they will be listed in the recommendations section. You can opt for fixing these recommendations.
Step1: Resolving remaining dependencies
After you have fixed the stated dependencies click on [Next Step] button.
Step 2: Set your database credentials
- Keep the Database Driver to preset MYSQL PDO
- Enter database name mautic, database username mauticuser and password that you have set.
- No need to set Backup existing tables Option if this is your first installation
- Click on next
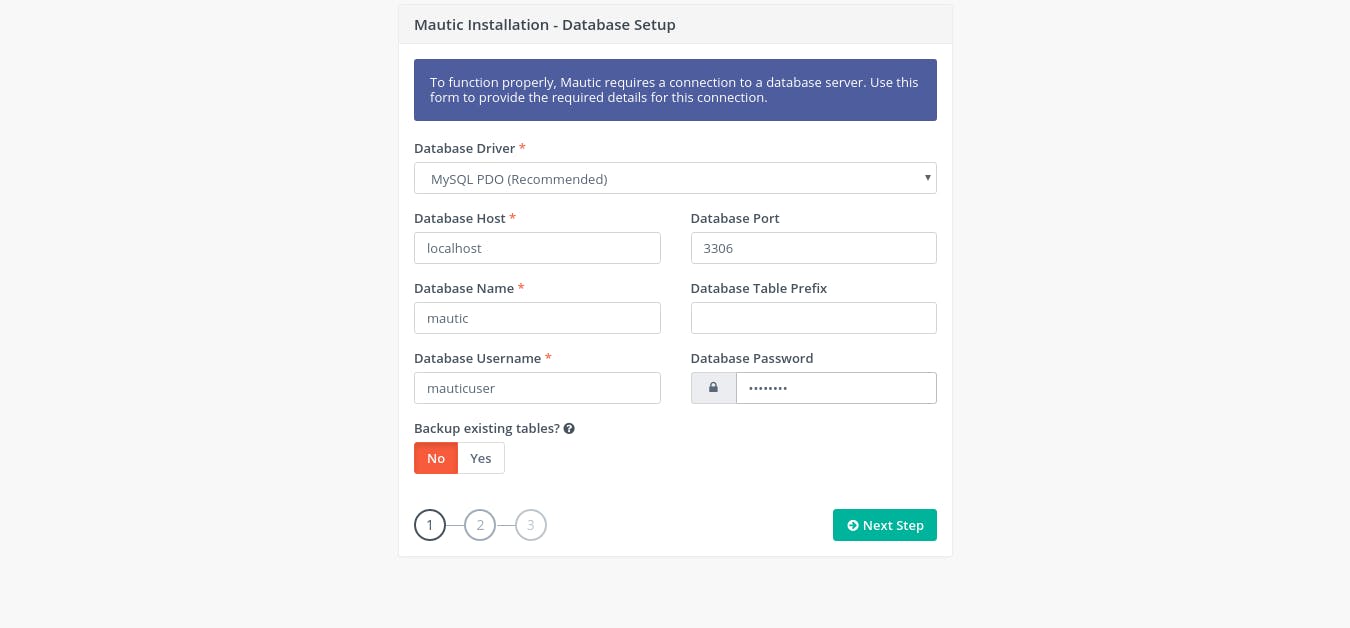
Click on the Next Step button.
Note:- If you are having a problem with the blank Database Driver dropdown please make sure that you have all PHP dependencies installed you might haven't installed mysqlmd php dependency.
Step 3: Set Admin user settings
Enter the Admin credentials, these credentials will be used when logging in the Mautic user panel.
The email address you enter will be used for password resets.
Click on the Next Step button.
Before you proceed to the next step you will need our Pepipost SMTP server credentials.
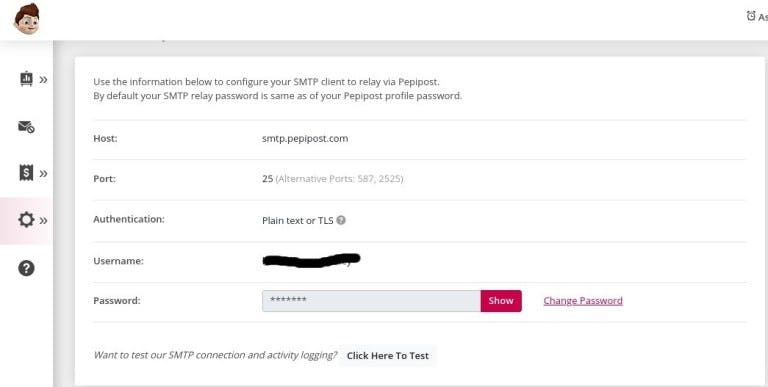
Step 4: Get your Pepipost SMTP credentials
- Log in with your user credentials on Pepipost application
- Open SMTP integration panel using this link
- You will find your SMTP credentials in SMTP Relay tab
Please check the screenshot provided below for reference:
You will use these credentials to set up our SMTP configuration in the next step
Step 5: Set SMTP configuration settings
Now back at the Mautic installation screen
In [Who should the email be sent as?] section there are two parameters
- Your from-name that would be seen on the send email.
- Your from-email-id, for example, [email protected]. The domain name should be a valid and verified domain in order to send emails from the Pepipost mail server.
in [How should email be spooled and delivered?] section you will be setting the following options.
In Email handling, there are two options.
- First is Send Immediately: This is recommended if your email list is not too large else it will result in a slowdown.
- Second is Queue: This option means that the mail list will be kept in a message pool and are in a wait state until it is executed in a batch by send email cron.
Mailer transport: Select [Other SMTP Server]
Server: smtp.pepipost.com
Port: 25 [or you can set the port to 587 if 25 is blocked at your sever]
Encryption: TLS
Authentication mode: Login
Username: Your_Pepipost_username
Password: Your_Pepipost_password
Click on Next step
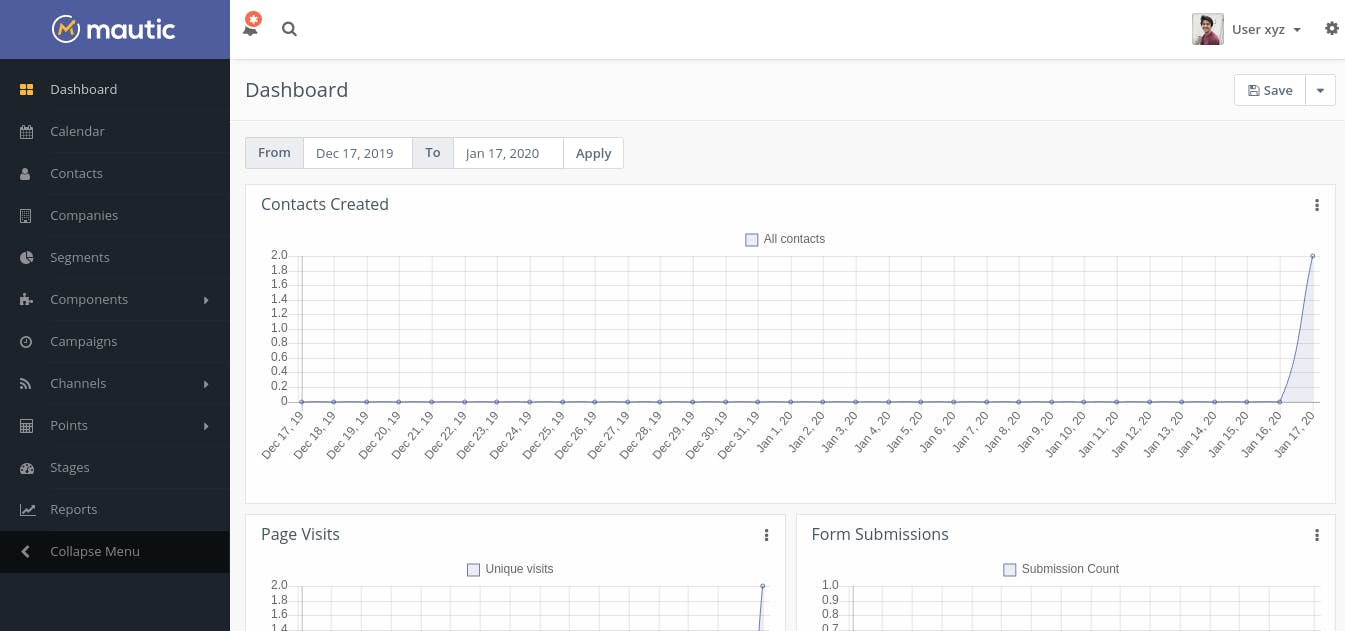
After this, you will be redirected to the login panel. Log in with your credentials and with this you will move on to the next step
This is how your dashboard will look
Adding Cron Jobs:
Cronjob is nothing but a scheduler that runs the specified path at a specified interval. Every action and updates done in the Mautic is mostly done by the Cron job running at regular intervals, If they are not set most of the Mautic's functionalities won't work.
For installing Cron jobs use the following command.
$ apt-get install cron
Follow these steps to add Mautic Cron jobs.
$ sudo crontab -e
Add the following Crons
*/5 * * * *  php /var/www/html/mautic/app/console mautic:segments:update >> /var/log/crontab.log 2>&1

*/10 * * * *  php /var/www/html/mautic/app/console mautic:campaigns:update >> /var/log/crontab.log 2>&1

*/12 * * * *  php /var/www/html/mautic/app/console mautic:campaigns:trigger >> /var/log/crontab.log 2>&1

*/15 * * * *  php /var/www/html/mautic/app/console mautic:emails:send >> /var/log/crontab.log 2>&1
Based on the Cron set up your contacts, campaign and emails will be triggered, you might want to change the time interval of all of these Cron jobs based on your requirements.
Note: It is recommended that the Cron job interval doesn't collide with each other so keep the Cron timings unique.
Sending your first test mail
Step 1: Add new contacts
There are two steps for creating new contacts
1. Single contact creation
- Click on contacts in the navbar
- Click on New
- You will be able to view a detailed form in which you can add user credentials, for testing purposes you can add email and username.
- Click on [Apply]
- Click [Save & Close]
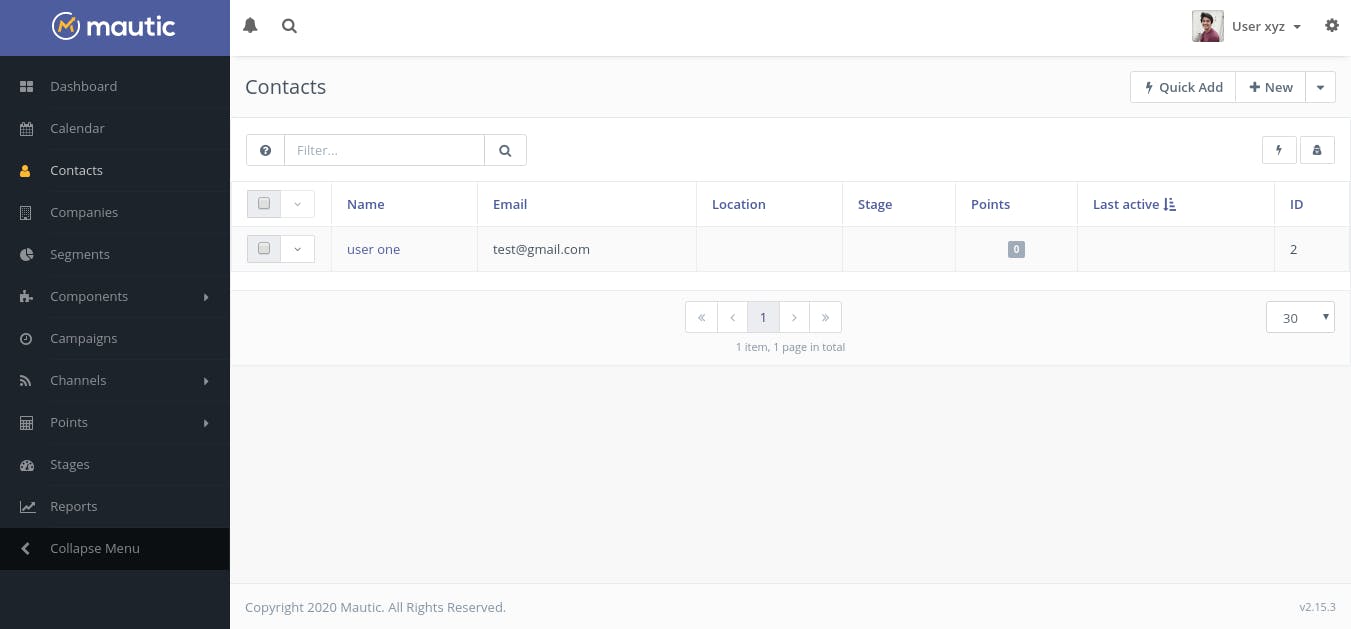
- In your contact panel, you will be able to see the newly created contact
2. Bulk Upload email list
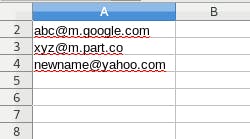
- Create a new CSV file with a list of emails that you want to send your emails to. Refer below image for CSV file reference.
- Click on contacts in the navbar
- Click on the dropdown arrow next to prev button
- Click on import
- File upload panel will open
- Click on choose file
- Select the CSV files of email list and click on upload
- You can change the limit option when you are uploading a large CSV file, this parameter decides the number of email batches that Mautic will start importing at a time.

- After this, you will be redirected to the Import panel, where you can select multiple options for the upload.
- There are two sections in this panel the first one is optional which you can set to customize your import
- In the second section, the values will be visible above the dropdown select the appropriate dropdown value according to the value above it, for example, Clients First Name should be assigned to First name dropdown and email id to email as shown in the screenshot below.
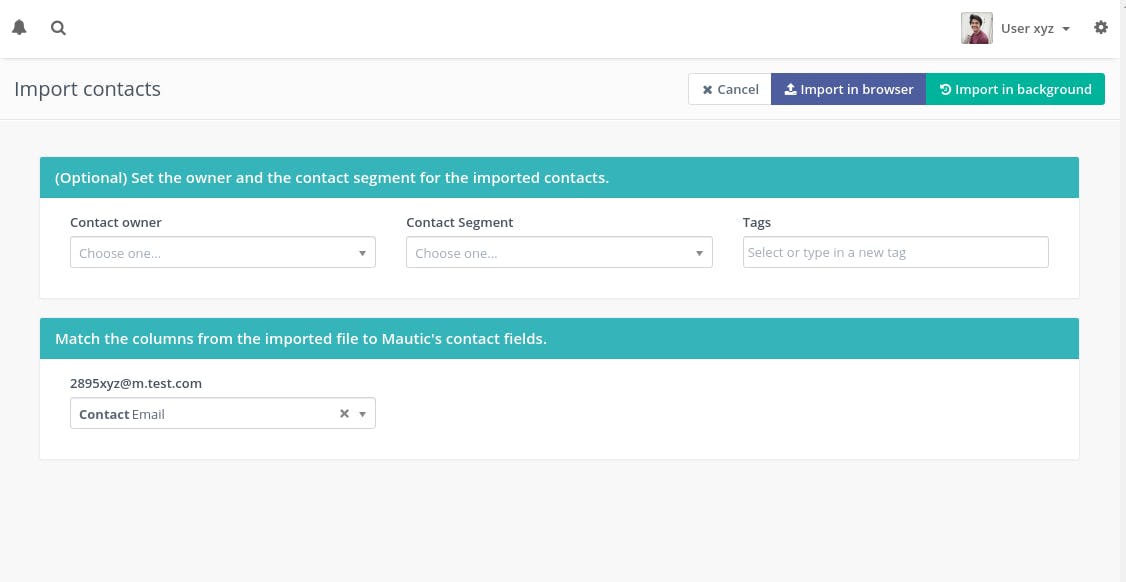
- Now there are two options to import, First is Import in the browser(For small email lists could be in hundreds or a thousand) the import needs the browser window to stay open. It is faster and you will be able to see the progress through a progress bar but is not recommended for a very large email list.
- The second is import in the background which is recommended for a large import list which could be in the ten thousand or in millions but doesn’t need the browser to be kept open.
- After the import, the success message would be displayed and you can view the imported contacts.
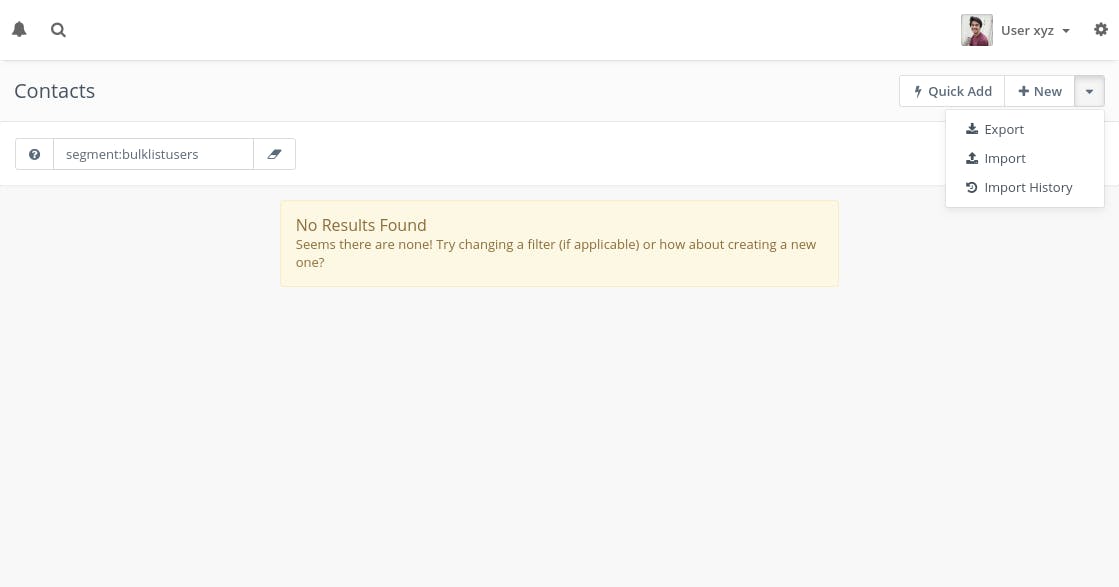
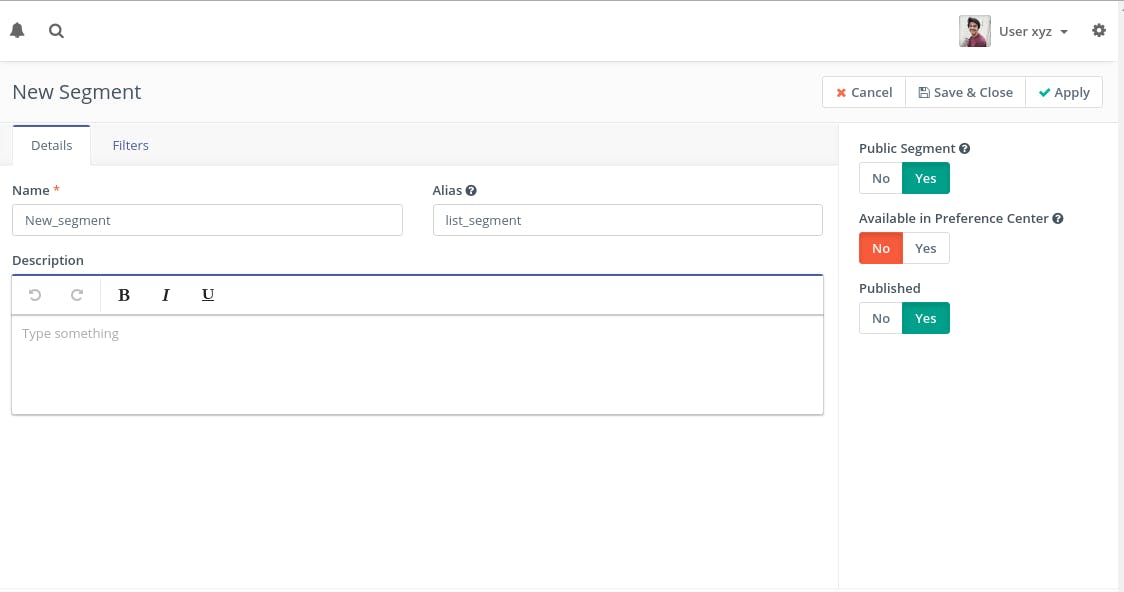
Step 2: Create a new segment
- Click on Segments in the navbar
- There would be no segments created In the segments panel so click on New button
- Enter segment name and alias (you can leave this empty, it will autogenerate if it is set to blank)
- Click on the Filters tab
- Now you will be filtering the email list on email id, So in the dropdown select the email
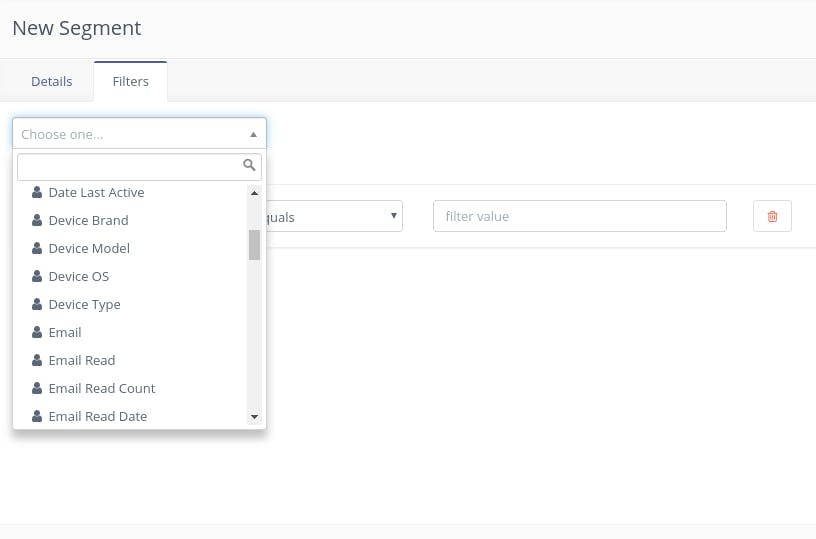
- Set the email filtering conditions based on which particular emails will be grabbed from your email list to your campaign.
- You can use the filtering in a really flexible way to filter out the emails, for more information on segments please refer this link
- For this tutorial, you will select [is not empty] option in order to select all emails in the list by setting an email filter to not empty.
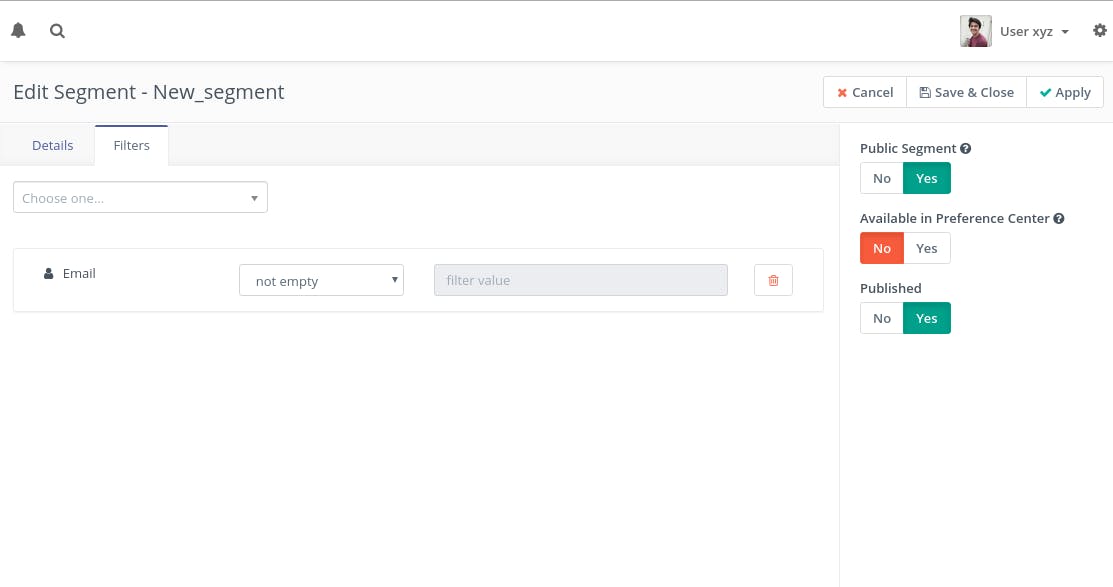
- Click on Apply -> Save & Close
- Depending upon the Cron set up your segment list will be populated
Step3: Create a new campaign
- Click on campaigns section in the navbar
- Click on the New button
- Enter campaign name and description
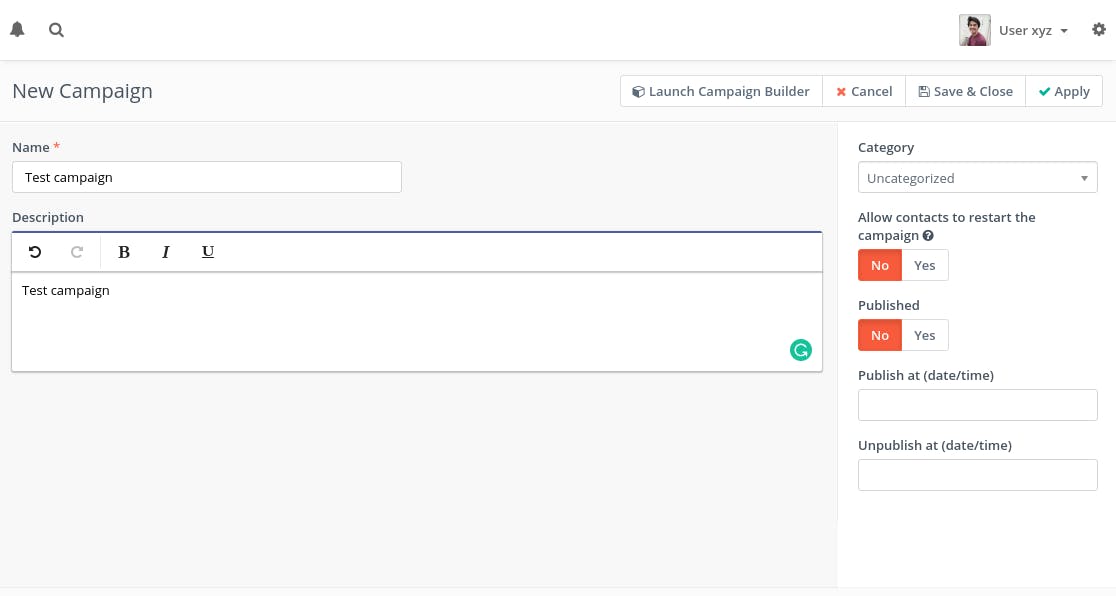
- Click on [Launch campaign builder]
- In contact source select [Contact Segments]
- A popup will open named Contact Source in it select the segment you want to apply and click on add
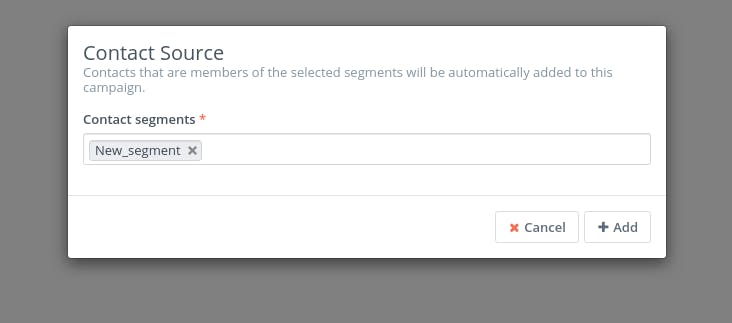
- Click on [Apply]->[Save & Close]
- After this, you will see a square block with the name of the segment on it
- Click on the grey semicircle and you will be able to see some options as shown in the image
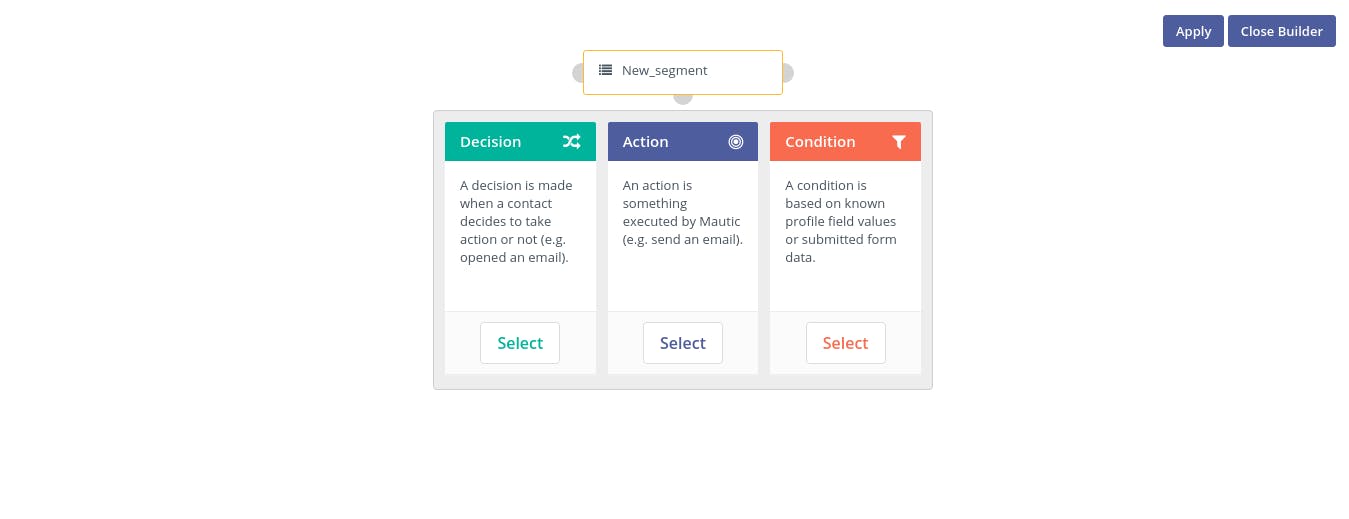
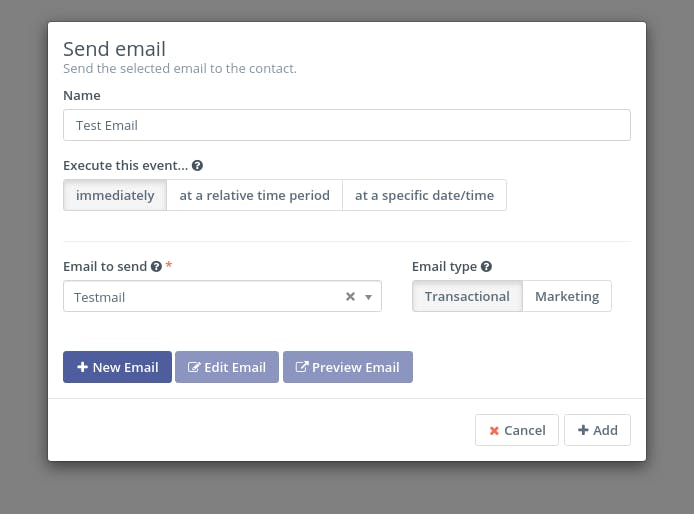
- Click on the select button inside the Action section and select Send Email from the dropdown which will appear once you click on select.
- A popup will open named Send Email.
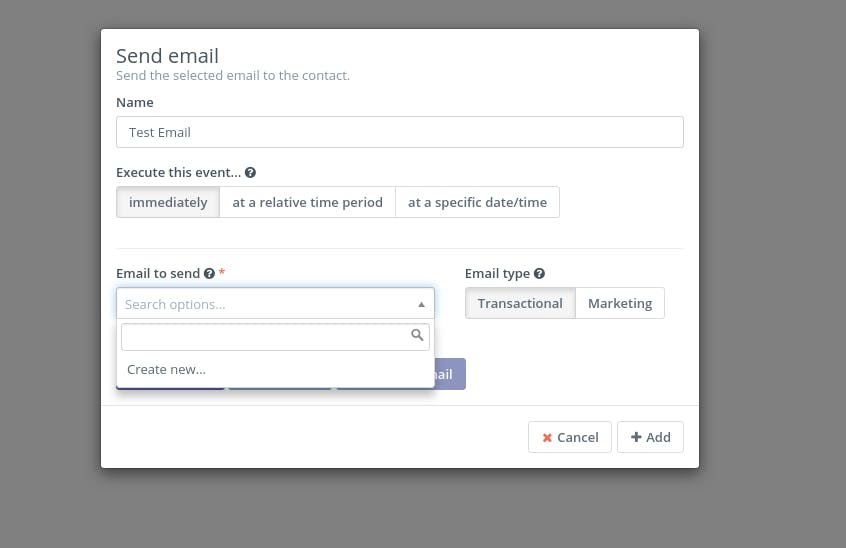
- Set the Email name
- Inside Email to send click on the Create new dropdown
- A popup will open with a number of email templates that you can use to send the email.
- For now, you can select the Blank template option.
- Enter some basic credentials like Subject, Internal name.
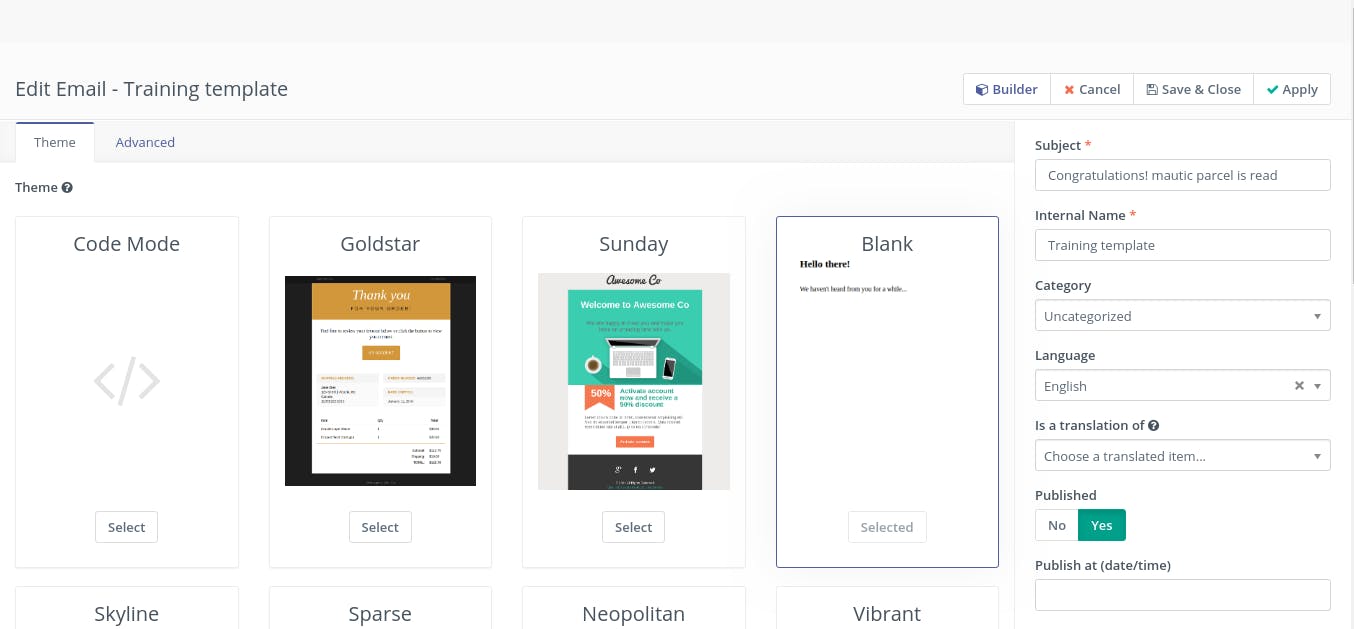
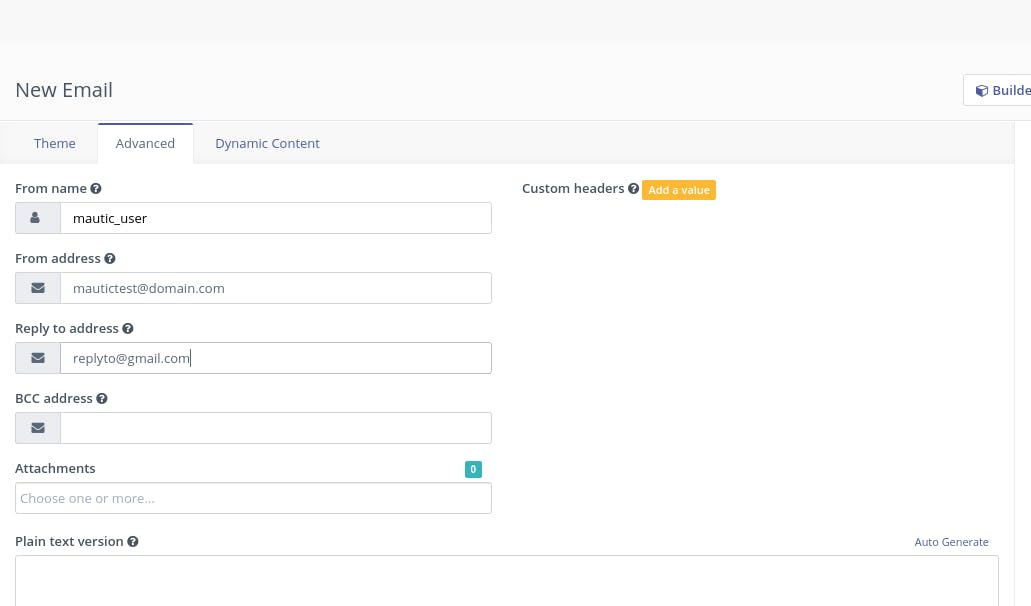
- Click on the Advanced tab
- Enter From-name
- Enter From-address as your valid from address is with a valid domain name
- Enter Reply-to address
- Click on Builder button to open builder, a new window will open
- Create your email body as per your requirements
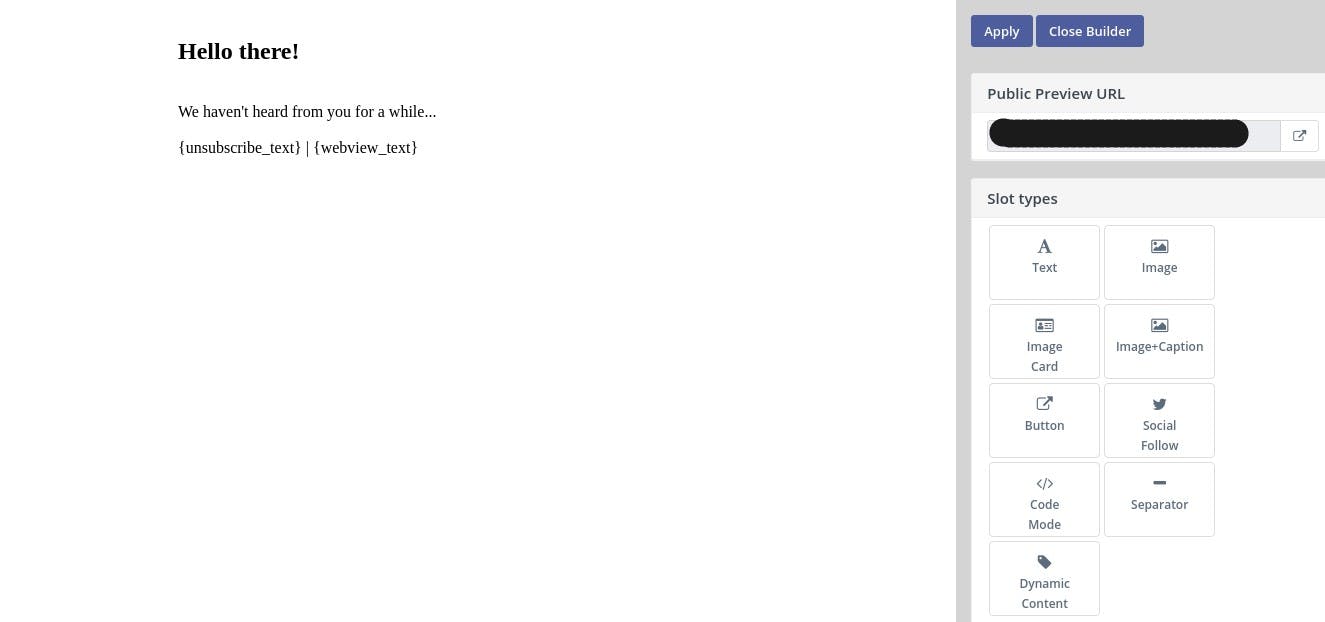
- Click on [Apply] -> [Save & Close] and close the window
- Set email type according to your needs
- Click on add. The panel will close and you will be able to see the email flow in a relational diagram.

- Click on [Apply] -> [Close Builder]
- In the Edit Campaign panel set published to Yes
- Click on [Apply] -> [Save & Close]
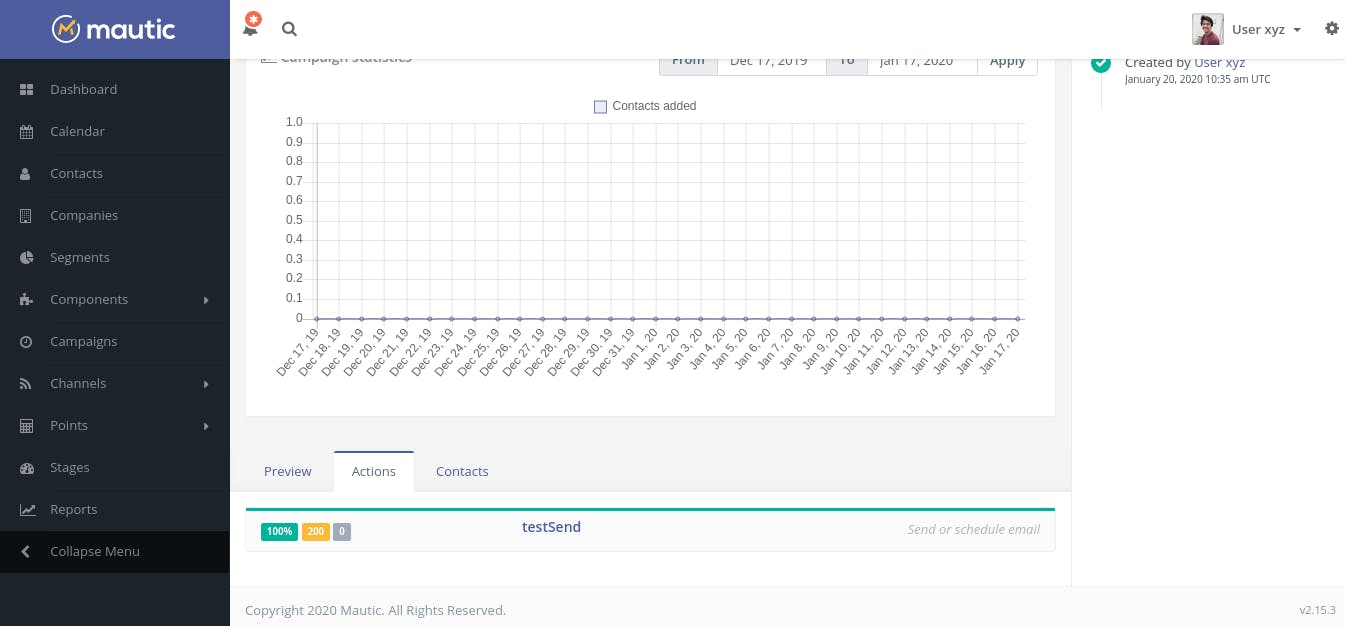
This will open the Campaign panel in which all the campaign status is represented in a graphical format in which you can track the emails that are being sent.
With this, your campaign is ready to send emails from your imported segment.
After some time as the Cron runs, you will be able to see the emails being populated in the dashboard.
You can check the progress of your campaign in the campaign panel.
Conclusion
By following the above-mentioned steps you are now ready to send emails through the Mautic platform. You are now able to upload an email list, create an email body, filter the email leads with segments and send emails using the Pepipost SMTP server.
Grade My Email
Check your spam now?
Netcorecloud's toolkit is the solution to all your email problems.


You can also explore
Netcore connects & unifies your data across all sources, connects to your marketing channels and provides you with control over AI Powered automation and personalization.


Deploy emails that are
screenshot worthy!

Unlock the Secrets of Your Domain, Discover Limitless Possibilities! ✨
Get a Free Domain Health Check Now!
Hitesh Pandey💻
Full Stack Developer, Pepipost
🥑 Developer Evangelist | 🥇Email Geek