
How to install Magento 2 on Ubuntu 18.04 [Complete Guide]

Published on 2020-02-06· Updated on 2021-12-15
Introduction
Magento is one of the most popular open-source e-commerce platform written in PHP powered by Zend framework. In this tutorial, you will learn the steps required to install and setup Magento on your Linux/Ubuntu 18.04 server.
Prerequisites
- PHP 5.6.19 +
- MySQL 5.6 +
- Apache
- Recommended 2GB of RAM
Installation
Step 1: First step is to install Apache2
To install and setup Apache use the following commands:
$ sudo apt install apache2
$ sudo systemctl start apache2
$ sudo systemctl enable apache2
Step 2: Create a new Apache virtual host and configure it.
Create a new configuration file name magento.conf
$ sudo vim /etc/apache2/sites-available/magento.conf
Paste the following code into the newly created config file
<VirtualHost *:80>
     ServerAdmin [email protected]
     DocumentRoot /var/www/html/magento/
     ServerName domain.com
     ServerAlias www.domain.com

     <Directory /var/www/html/magento/>
        Options Indexes FollowSymLinks MultiViews
        AllowOverride All
        Order allow,deny
        allow from all
     </Directory>

     ErrorLog ${APACHE_LOG_DIR}/magento_error.log
     CustomLog ${APACHE_LOG_DIR}/magento_access.log combined
</VirtualHost>
Now with this, you will be debugging all the Magento setup related errors in the magento_error.log and magento_access.log
Step 3: Enable Rewrite mod
$ sudo a2ensite magento.conf
$ sudo a2enmod rewrite
Step 4: Installing PHP and dependencies
Use the below command to install all required PHP dependencies:
$ sudo apt install php7.2 libapache2-mod-php7.2 php7.2-common php7.2-gmp php7.2-curl php7.2-soap php7.2-bcmath php7.2-intl php7.2-mbstring php7.2-xmlrpc php7.2-mcrypt php7.2-mysql php7.2-gd php7.2-xml php7.2-cli php7.2-zip
Open the php.ini file
$ sudo vim /etc/php/7.2/apache2/php.ini
Change the following credentials:
file_uploads = On
allow_url_fopen = On
short_open_tag = On
memory_limit = 512M
upload_max_filesize = 128M
max_execution_time = 3600
Restart Apache service.
$ sudo systemctl restart apache2
Step 5: Setting up MySQL Server
- Install MySQL server
$ sudo apt install mysql-server
- Set MySQL root password
- After the installation a temporary password will be generated in the mysqld.log file you can access this password by the following command
$ sudo grep 'temporary password' /var/log/mysqld.log
- Now you will get a message something like this
[Note] A temporary password is generated for root@localhost: b*-rkuIR4Zasd
- Copy this password for the next step
- Enter this command
$ sudo mysql_secure_installation
- This will prompt you to validate your password enter Y
- After this, you will be prompted to set your password strength. Enter your choice between LOW, MEDIUM and STRONG.
- Enter new password
- You can say yes to all the other prompts that come after this
- You will now be prompted with multiple questions on how to set up the MySQL installation. You can set Y to all the prompts
- You will be able to login with the user root and a blank password
- Login to MySQL
$ sudo mysql -u root -p
- Create a Magento database and add User
mysql > create database magento;
mysql > CREATE USER 'magentouser'@'localhost' IDENTIFIED BY 'password';
mysql > GRANT ALL PRIVILEGES ON * . * TO 'magentouser'@'localhost';
mysql > FLUSH PRIVILEGES;
mysql > exit;
Step 6: Install composer
You need Composer to install all the Magento and its dependencies
Use the below command to install composer globally on your Ubuntu system:
$ php -r "copy('https://getcomposer.org/installer', 'composer-setup.php');"
$ sudo php composer-setup.php --install-dir=/usr/bin/ --filename=composer
Check the composer installation using the below command:
$ composer -v
Step 7: Acquire / Generate secret keys from your Magento market place user account. (Required only for installation through composer)
In order to install Magento in the next step, you will have to specify Public and Private keys from your Magento market-place account. If you haven't registered yet you can register here.
- Login to Magento Marketplace here.
- Click on your username dropdown in the top navbar > My Profile

- Click on [Access Keys]

- Click on [Create A New Access Key]

- Enter a key name and generate
After this, your Public and Private key will be generated. Use these for installation in the next step.
Step 8: Install Magento
- Installation using Composer
Enter your servers root directory
cd /var/www/html
Run the composer command to install Magento
$ sudo composer create-project --repository=https://repo.magento.com/ magento/project-community-edition magento
You will be prompted to provide a username password for this. Put your public key as the username and the private key as the password. It will take some time for the Composer to download and install all the required dependencies so be patient.
- Installation using the zip file
Open this link. In the download tab, select your preferred version and click on download.
Follow these commands
$ sudo mkdir /var/www/html/magento/
$ sudo tar -zxvf ~/Downloads/Magento-CE*.tar.gz -C /var/www/html/magento/
For copying from local to the remote machine
# On local machine
$ scp -r magento2-ce.zip user@<your-domain-name/ip-address>:/var/www/html/magento/magento.zip
# On remote machine
$ cd /var/www/html
$ mkdir magento
$ sudo tar -zxvf magento.zip -C magento/
Install dependencies from using composer
$ cd /var/www/html/magento/
$ composer install
After following the installation steps we can now open the Magento setup in your specified domain name or server IP address.
Common Errors & Exceptions
If you are getting 500 error after the installation please follow these steps:
- This problem is probably due to directory access problems. To solve that use the following commands:
$ sudo chown -R www-data:www-data /var/www/html/magento
$ sudo chmod -R 755/var/www/html/magento
You have to set the user group according to your setup.
Your user group will depend on your Http server instance. In our case it was www-data it might be nginx or apache by default, depending on the setup. You can check that by using these commands
$ ps aux | grep apache
$ groups <apache-user>
If you are still getting errors you can debug those errors by referring the following logs
$ tail -f /var/log/apache2/magento_error.log $ tail -f /var/log/apache2/magento_access.log
Step 9: Magento Setup
- After accessing your URL this screen will be displayed

- Click on Agree and Setup Magento
- On the next screen click on Start Readiness Check

- Make sure that all the checks are positive if there are any dependencies that are missing, it will be displayed with the red cross mark so you can install it and try again. After confirmation, go to the next step.

- Enter the database credentials for Magento you've had created earlier in this tutorial and click on next.

- In the next step, you can set the web configuration details as per your requirements.

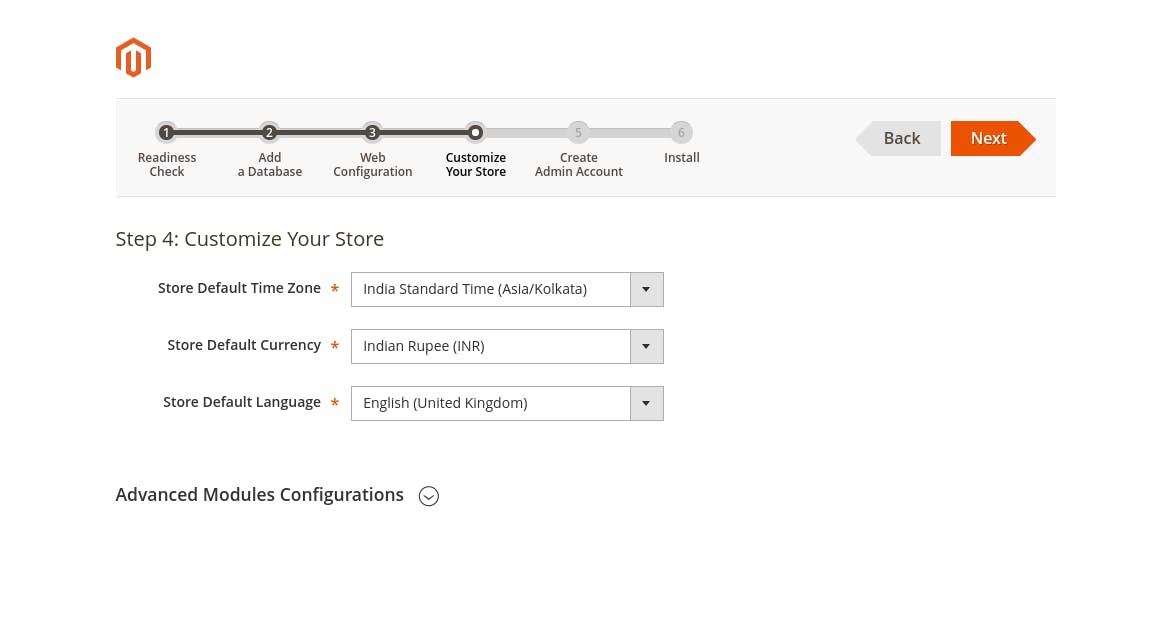
- Next step you will configure your timezone, language, and currency settings. You can select or unselect the modules you want from the list in advanced configuration.
- In the next step, you will set your admin login credentials

- After clicking on the Next button, your Magento setup is ready to be installed so click on the Install Now button.
Now you just have to wait for the installation to complete.
After the successful installation, all of your Magento setup details will be shown, you can note these and click on Launch Magento Admin.
This will open the login panel for Magento and you can log in with your admin credentials.
Setting up Cron Jobs
Cronjob is nothing but a scheduler that runs a specified file path at a specified interval. Magento needs some of these Cron Jobs to be set up in order to function properly.
To add these Crons follow this command.
$ cd /var/www/html/magento $ sudo php bin/magento cron:install
You can check the installed Magento Cron Jobs by using this command
$ sudo crontab -l
You should find theses settings in your Cron
* * * * * /usr/bin/php /var/www/html/magento/bin/magento cron:run 2>&1 | grep -v "Ran jobs by schedule" >> /var/www/html/magento/var/log/magento.cron.log * * * * * /usr/bin/php /var/www/html/magento/update/cron.php >> /var/www/html/magento/var/log/update.cron.log * * * * * /usr/bin/php /var/www/html/magento/bin/magento setup:cron:run >> /var/www/html/magento/var/log/setup.cron.log
And with this, your Magento setup is up and ready to be used for your E-Commerce site.
Conclusion
By following the above-mentioned steps you are now ready to create your e-commerce platform with a working Magento installation. In case you have encountered something, which is not covered as a part of this tutorial, then please feel free to share those below in the comments.
Grade My Email
Check your spam now?
Netcorecloud's toolkit is the solution to all your email problems.


You can also explore
Netcore connects & unifies your data across all sources, connects to your marketing channels and provides you with control over AI Powered automation and personalization.


Deploy emails that are
screenshot worthy!

Unlock the Secrets of Your Domain, Discover Limitless Possibilities! ✨
Get a Free Domain Health Check Now!

Hitesh Pandey💻
Full Stack Developer, Pepipost
🥑 Developer Evangelist | 🥇Email Geek