
[Updated] Configure Postfix Send Mail Using an External SMTP Server?

Published on 2019-08-29· Updated on 2021-12-15
The author voluntarily contributed this tutorial as a part of Pepipost Write to Contribute program.
Introduction
Postfix is one of the most popular open-source Mail Transfer Agent (MTA) which route and delivers mails. But, there are many reasons why you don't want to send emails using the local server instead you want to integrate your Postfix with an external SMTP provider such as Pepipost, Sendgrid, Mandrill, Amazon SES or any other SMTP server to deliver your emails.
There is always a benefit of configuring external SMTP providers for sending an email, where you just need to check that your postfix is always running and relaying your mails to the Email service provider rather thinking about the deliverability.
And, the second biggest reason is to avoid your emails getting tagged as spam, if your server's IP address is added in the spam list of major Internet Service Providers like Google, Yahoo, Outlook, etc.
In the cognisance of the above, you can now stop spam sign-up bots and avoid spam traps.
Prerequisites
Before going ahead on this documentation. Please ensure you have the following:
- One valid domain name eg: example.com, which should be pointing to your server.
- A valid SMTP user name and password from your email service provider such as Pepipost, Sendgrid, Mailgun etc.
- Installed postfix and updated all the dependencies.
Installing Postfix
Refer how to install Postfix before your proceed (recommended reading).
Here is a summary of commands to install Postfix:
sudo apt-get install postfix #For Ubuntu
sudo yum install postfix #For Centos
sudo dnf install postfix #For Fedora
Configuring Postfix
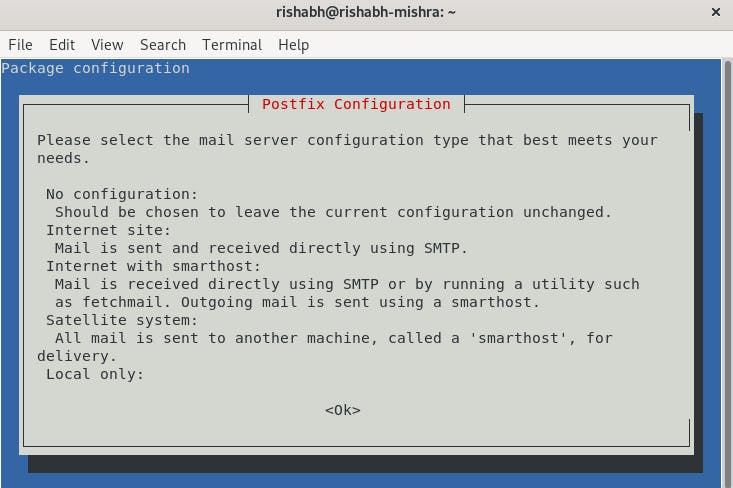
Step 1: During The Installation Of Postfix, You Will See A Screen Like The One Below Which Will Be Asking You To Choose The Type Of Configuration.
Press Enter to see next screen which shows options to select.
Mainly there are 4 configurations:
- Internet site
- Internet with smarthost
- Satellite system
- Local Only
The default option is the Internet Site and that’s the recommended one for this tutorial too. So, press TAB, then ENTER to continue with the installation.
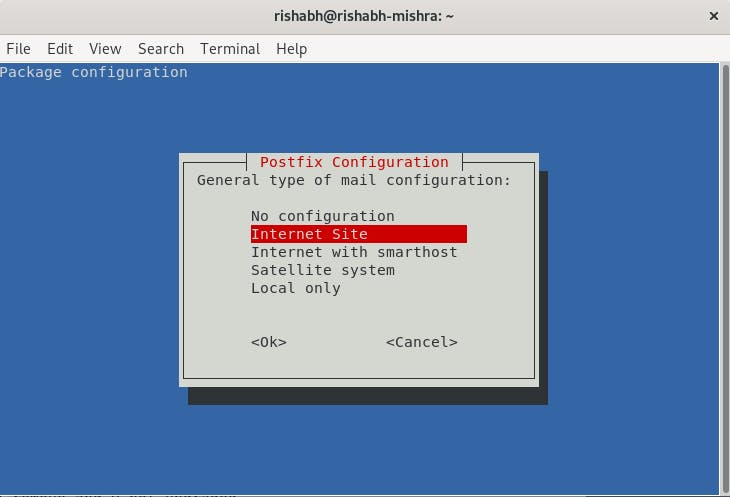
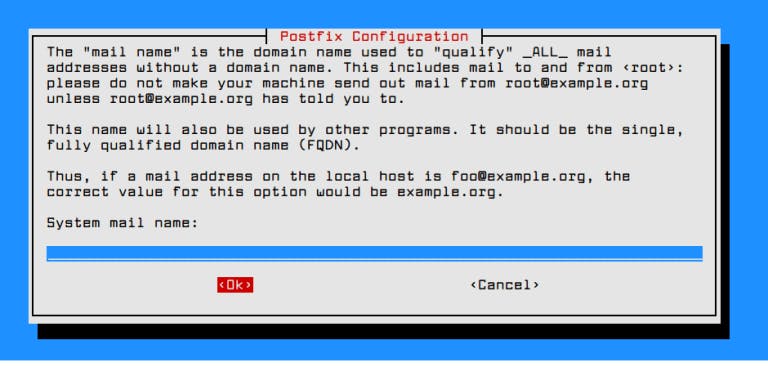
Select Internet Site and press OK. you will be asked to enter the System mail name, which is actually the domain name. Enter your domain which you have mapped to this server earlier and also this domain need to be registered with your SMTP service provider too.
If it shows a subdomain like subdomain.yourcompany.com, change it to just yourcompany.com. When you’ve finished, press TAB, then ENTER.
Now, your postfix is successfully installed on your server. Now, the next steps are to configure the Postfix by modifying its settings.
Step 2: Configuring Fully Qualified Domain With Your Hostname.
Once the installation is done. Open /etc/postfix/main.cf with your favorite editor. Search for myhostname and change it to the domain which you have registered with your Email service provider.
vim /etc/postfix/main.cf
and update the below parameter with your domain:
myhostname = m3.example.com
Step 3: Configuring SMTP Usernames And Passwords.
SMTP credentials are always stored in sasl_passwd in /etc/postfix directory. In this file, you'll add your external SMTP mail provider's Username and password credentials.
a. Open or create the file using below command:
sudo vim /etc/postfix/sasl_passwd
b. Add your SMTP host, username and password in the following order:
[smtp.example.com] username:password
Note: If you want to specify TCP port then use the following format:
[smtp.example.com]:587 username:password
c. create the hash file for Postfix using the postmap command
sudo postmap /etc/postfix/sasl_passwd
If the above command is executed successfully, then you should have a new file named sasl_passwd.db in the /etc/postfix/.
Since sasl_passwd consists of username and password in plain text, so it is recommended to change the file permission to root. This is to esnure that only the root user is able to read and edit the credentials in this file.
Run the following commands to change the ownership and to set the permission:
sudo chown root:root /etc/postfix/sasl_passwd /etc/postfix/sasl_passwd.db
sudo chmod 0600 /etc/postfix/sasl_passwd /etc/postfix/sasl_passwd.db
Step 4: Configuring Relay Host
Let’s configure external SMTP server in /etc/postfix/main.cf
sudo vim /etc/postfix/main.cf
Note: if you have specified port no in sasl_passwd i.e. 587 as in the above example, then we need to specify in the same in the main.cf file also.
relayhost = [smtp.example.com]:587
Step 5: Adding Custom Configuration At The End Of File
# enable SASL authentication
smtp_sasl_auth_enable = yes
# disallow methods that allow anonymous authentication.
smtp_sasl_security_options = noanonymous
# where to find sasl_passwd
smtp_sasl_password_maps = hash:/etc/postfix/sasl_passwd
# Enable STARTTLS encryption
smtp_use_tls = yes
# where to find CA certificates
smtp_tls_CAfile = /etc/ssl/certs/ca-certificates.crt
Save your changes and close the file.
Step 6: Restart The Service To Refresh The Configuration Accordingly.
sudo service postfix restart
Testing Postfix
Now we’ll test whether our SMTP server can send emails to an external account using mail command of mailutils package. Postfix logs can help as well.
echo "This is the body of the email" | mail -s "This is the subject line" email_address
Change body and subject line accordingly and in place of email address use valid email id.
Check the inbox or spam folder of your mailbox where you sent the email.
Note that with this configuration, the address in the From field for the test emails you send will be [email protected], where yourusername is your Linux username and example.com is the domain set in your server’s hostname. If you change your username, the From address will also change.
Note: Your domain example.com which you are using to send emails, needs to be added and whitelisted on your respective third party SMTP providers like Pepipost, Sendgrid, etc.
You can also check the email sending logs in /var/log/mail.log
Read here : Detailed procedure for testing Postfix.
SMTP Configuration with different Providers
Settings For Pepipost
Use these steps if you are using Pepipost SMTP to send emails.
As mentioned earlier, you need to just change these two files:
/etc/postfix/main.cf
/etc/postfix/sasl_passwd
Open file /etc/postfix/sasl_passwd and add SMTP credentials to the file
[smtp.pepipost.com]:587 USERNAME:PASSWORD
Change the host in /etc/postfix/main.cf file
relayhost = [smtp.pepipost.com]:587
Update your hash file using postmap commands
sudo postmap /etc/postfix/sasl_passwd
Restart the service
sudo service postfix restart
Settings For Sendgrid
Use these steps if you are using Pepipost SMTP to send emails.
As mentioned earlier, you need to just change these two files:
/etc/postfix/main.cf
/etc/postfix/sasl_passwd
Open file /etc/postfix/sasl_passwd and add SMTP credentials to the file
[smtp.sendgrid.net]:587 USERNAME:PASSWORD
Change the host in /etc/postfix/main.cf file
relayhost = [smtp.sendgrid.net]:587
Update your hash file using postmap commands
sudo postmap /etc/postfix/sasl_passwd
Restart the service
sudo service postfix restart
Settings For Mandrill
Use these steps if you are using Pepipost SMTP to send emails.
As mentioned earlier, you need to just change these two files:
/etc/postfix/main.cf
/etc/postfix/sasl_passwd
Open file /etc/postfix/sasl_passwd and add SMTP credentials to the file
[smtp.mandrillapp.com]:587 USERNAME:API_KEY
Change the host in /etc/postfix/main.cf file
relayhost = [smtp.mandrillapp.com]:587
Update your hash file using postmap commands
sudo postmap /etc/postfix/sasl_passwd
Restart the service
sudo service postfix restart
Grade My Email
Check your spam now?
Netcorecloud's toolkit is the solution to all your email problems.


You can also explore
Netcore connects & unifies your data across all sources, connects to your marketing channels and provides you with control over AI Powered automation and personalization.


Deploy emails that are
screenshot worthy!

Unlock the Secrets of Your Domain, Discover Limitless Possibilities! ✨
Get a Free Domain Health Check Now!

Vikram Sahu 🦉
Developer Evangelist, Pepipost
💻 Senior Software engineer → 🥑 Developer Relations guy → 🤓 Building Community for Email Geeks 🎟 → Speaker 🎙